
What Is A Relayer?
A relayer is a contract that is authorized by the protocol and users to make calls to the Vault on behalf of the users. It can use the sender’s ERC20 vault allowance, internal balance and BPTs on their behalf. Multiple actions (such as exit/join pools, swaps, etc) can be chained together which improves the UX.
For security reasons a Relayer has to be authorised by the Balancer DAO before it can be used (see previous votes for V1 and V2) and even after authorisation each user would still be required to opt into the relayer by submitting an approval transaction or signing a message.
How It Works
Contracts
The Balancer Relayers are composed of two contracts, BalancerRelayer, which is the single point of entry via the multicall function and a library contract, such as the V3 VaultActions, which defines the allowed behaviour of the relayer, for example – VaultActions, LidoWrapping, GaugeActions.
Having the multicall single point of entry prevents reentrancy. The library contract cannot be called directly but the multicall can repeatedly delegatecall into the library code to perform a chain of actions.
Some psuedo code demonstrating how an authorisation, exitPool and swap can be chained and called via the multicall function:
const approval = buildApproval(signature); // setRelayerApproval call
const exitPoolCallData = buildExitPool(poolId, bptAmt); // exitPool call
const swapCallData = buildSwap(); // batchSwap call

const tx = await relayer.multicall([approval, exitPoolCallData, swapCallData]);
Approval
A user has to approve each Relayer before they can use it. To check if a Relayer is approved we can use hasApprovedRelayer on the Vault:
const isApprove = await vault.hasApprovedRelayer(userAddress, relayerAddress)And we can grant (or revoke) approval for a given relayer by using setRelayerApproval:
const approvalTx = await vault.setRelayerApproval(userAddress, relayerAddress, isApprove);A Relayer can also be approved by using the setRelayerApproval function from the BaseRelayerLibrary contract. Here a signed authorisation message from the user is passed as an input parameter. This allows an approval to be included at the start of a chain of actions so the user only needs to submit a single transaction creating a better UX.
Chained References
Output References allow the Relayer to store output values from once action which can then be read and used in another action. This allows us to chain together actions. For example we could exit a pool, save the exit amounts of each token to a reference and then do a batchSwap using the references as input amounts for each swap:
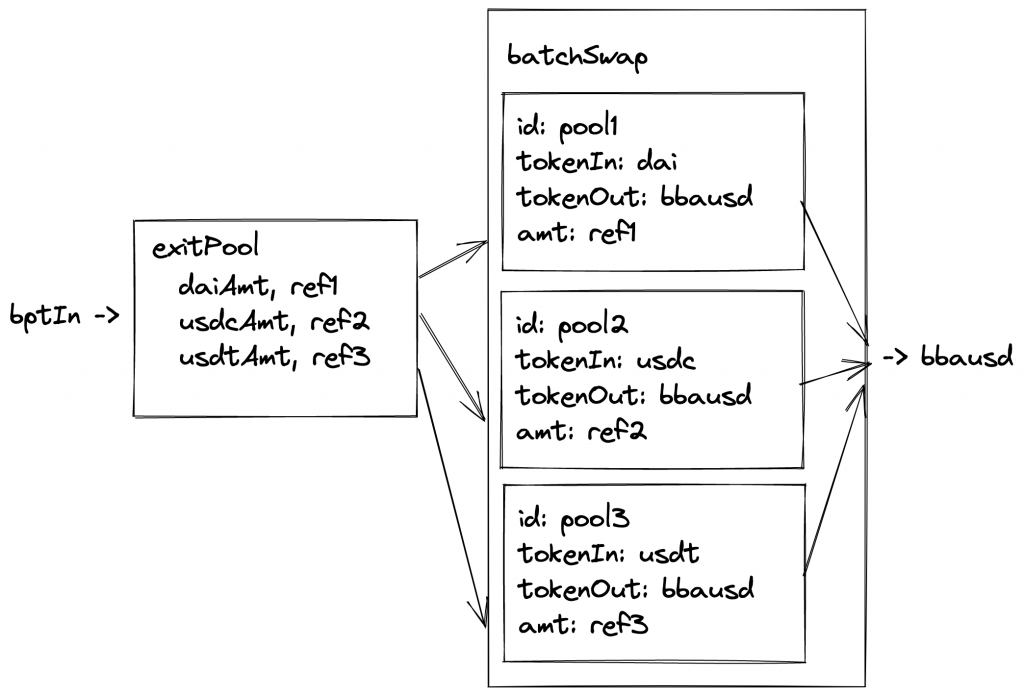
An OutputReference consists of an index and a key:
struct OutputReference {
  uint256 index;
  uint256 key;
}
Where the key is the slot the value will be stored at. Index indicates which output amount should be stored. For example if exitPool exits to 3 tokens, DAI (index 0), USDC (1), USDT (2), we would want to use index 0 to store DAI, 1 for USDC, etc.
Example Use Case – Pool Migration
Intro
Balancer aims for the best capital efficiency for LPs so it made sense to offer the option to migrate from the old “staBal3” pool consisting of DAI, USDC and USDT to a new “boosted” stable pool which is more capital efficient because it uses yield bearing assets.
To migrate between these pools would take multiple steps:
- unstake from staBal3 gauge → staBalBpt
- exitPool from staBal, staBalBpt → DAI, USDC, USDT
- join the bb-a-usd2 pool by using batchSwaps
- DAI → bbausd2Bpt
- USDC → bbausd2Bpt
- USDT → bbausd2Bpt
- stake bbausd2Bpt in gauge
This would be quite an ordeal for a user to do manually but the Relayer can be used to combine all these actions into a single transaction for the user.
Details
As this is a well defined one off action we decided to add this function to the SDK as a “Zap” under a Migrations module. The user can call the staBal3 function to get all the call data required to call the tx:
{ to, data } = migrations.stabal3(
  userAddress,
  staBal3Amount,
  minBbausd2Out,
  isStaked,
  authorisationSignature
);
Behind the scenes all the call data for each step is crafted and the encoded multicall data is returned:
calls = [
        this.buildSetRelayerApproval(authorisation),
        this.buildWithdraw(userAddress, staBal3Amount),
        this.buildExit(relayer, staBal3Amount),
        this.buildSwap(minBbausd2Out, relayer),
        this.buildDeposit(userAddress),
      ];

const callData = balancerRelayerInterface.encodeFunctionData('multicall', [
      calls,
    ]);
buildSetRelayerApproval allows the user to pass the approval signature if this is their first time using the relayer. This allows us to approve and execute the migration all in a single transaction.
buildWithdraw and buildDeposit handle the gauge actions. The initial call is to withdraw from the staBal gauge and the final call deposits the bbausd2 bpt into the new gauge. We withdraw directly to the Relayer address rather than the users. The gauges return the tokens to the caller, so sending them to the user costs more as we need to manually transfer them:
gauge.withdraw(amount);
// Gauge does not support withdrawing BPT to another address atomically.
// If intended recipient is not the relayer then forward the withdrawn BPT on to the recipient.
if (recipient != address(this)) {
    IERC20 bptToken = gauge.lp_token();
    bptToken.transfer(recipient, amount);
}
Skipping this has two benefits. Firstly it saves gas by avoiding an extra transfer. It also avoids approval issues as now the Relayer is just using its own funds. The final deposit uses the userAddress to send the staked tokens from the Relayer back to the user.
buildExit creates the exitPool call:
// Ask to store exit outputs for batchSwap of exit is used as input to swaps
    const outputReferences = [
      { index: assetOrder.indexOf('DAI'), key: EXIT_DAI },
      { index: assetOrder.indexOf('USDC'), key: EXIT_USDC },
      { index: assetOrder.indexOf('USDT'), key: EXIT_USDT },
    ];

    const callData = Relayer.constructExitCall({
      assets,
      minAmountsOut: ['0', '0', '0'],
      userData,
      toInternalBalance: true,
      poolId: this.addresses.staBal3.id,
      poolKind: 0, // This will always be 0 to match supported Relayer types
      sender,
      recipient: this.addresses.relayer,
      outputReferences,
      exitPoolRequest: {} as ExitPoolRequest,
    });
Output references are used to store the final amounts of each stable token received from the pool. We have precomputed the keys by using the Relayer.toChainedReference helper, like:
const EXIT_DAI = Relayer.toChainedReference('21');
const EXIT_USDC = Relayer.toChainedReference('22');
const EXIT_USDT = Relayer.toChainedReference('23');
These will be used later as inputs to the swaps.
Also of interest is the fact we set toInternalBalance to true. The Balancer V2 vault can accrue ERC20 token balances and keep track of them internally in order to allow extremely gas-efficient transfers and swaps. Exiting to internal balances before the swaps allows us to keep gas costs down.
Because we have previously exited into internal balances we also don’t have to worry about the users having previously approved the Relayer for the tokens:
if (fromInternalBalance) {
// We take as many tokens from Internal Balance as possible: any remaining amounts will be transferred.
uint256 deductedBalance = _decreaseInternalBalance(sender, token, amount, true);
// Because deductedBalance will be always the lesser of the current internal balance
// and the amount to decrease, it is safe to perform unchecked arithmetic.
amount -= deductedBalance;
}

if (amount > 0) {
token.safeTransferFrom(sender, address(this), amount);
}
so the amount will be 0 and the safeTransferFrom call will not be executed.
buildSwap – We can join bbausd2 using a swap thanks to the PhantomBpt concept so here we create a batchSwap call that swaps each stable token to the bbausdBpt and we use the output references from the exitPool call as the input amounts to the swap (which is great as we don’t need to precompute these).
const swaps: BatchSwapStep[] = [
    {
      poolId: this.addresses.linearDai2.id,
      assetInIndex: 1,    // DAI
      assetOutIndex: 2,   // bDAI
      amount: EXIT_DAI.toString(),
      userData: '0x',
    },
    {
      poolId: this.addresses.bbausd2.id,
      assetInIndex: 2,  // bDAI
      assetOutIndex: 0,  // bbausd2
      amount: '0',
      userData: '0x',
    }
    ...
    {
      poolId: this.addresses.linearUsdc2.id,
      assetInIndex: 3,  // USDC
      assetOutIndex: 4, // bUSDC
      amount: EXIT_USDC.toString(),
      userData: '0x',
    },
    ...
In the Relayer VaultActions contract we can see how the swap amounts are set to the value stored in the reference:
for (uint256 i = 0; i < swaps.length; ++i) {
	uint256 amount = swaps[i].amount;
  if (_isChainedReference(amount)) {
	  swaps[i].amount = _getChainedReferenceValue(amount); //e.g. EXIT_DAI
  }
}
And finally (😅) we use another output reference to store the total amount out of bbausd2:
const outputReferences = [{ index: 0, key: SWAP_RESULT_BBAUSD }];This is used as an input to the final gauge deposit to make sure we stake all the BPT that we have received and that should conclude the migration! You can see this in action on a local fork (yay no real funds required!) by running the integration test here.
Conclusion
The Balancer Relayer is probably not that well known so hopefully this has given a good overview of some of its functionality and flexibility. There’s a lot of room for experimentation and improvement of UX for complex operations so its worth investigating!
Photo by Austrian National Library on Unsplash