Axiom – Testing With Custom Foundry Cheat Codes

Intro

Axiom is a really exciting new protocol that harnesses ZK technology to allow smart contracts to trustlessly compute over the history of Ethereum. I believe its a novel new primitive for others to build with. The docs provide a lot of info about the protocol itself and has a helpful tutorial that can be followed to build an Autonomous Airdrop. An SDK is provided to improve the integration experience for developers and includes a CLI, React client and Typescript and Smart Contract libraries.

One of the SC libraries provides an extension to the standard Foundry test library and has a pretty interesting setup and implementations of custom cheat codes. I thought it would be interesting to investigate this a bit further using the test from the Autonomous Airdrop example as a reference example, specifically looking at AxiomTest in some more detail.

System Overview

To appreciate why the cheat codes are beneficial its useful to have a high level overview of the Axiom system. Following the flow of the Airdrop example:

  1. Query Initialisation
  • A query is sent to the AxiomV2Query contract sendQuery function. In the Airdrop example this is sent by the user from the UI
  • The query format spec can be found here
  • Will use the compute proof from an Axiom client Circuit
  • The query arguments can be created in a number of ways using the SDKs, e.g. CLINodeJSReact
  • Here the AxiomV2Callback is specified. This is what runs after query fulfillment
  1. Query Verification
  • Offchain Axiom indexes the query
  • Computes the result, and generate a ZK proof of validity
  1. Query Fulfillment
  • Axiom calls fulfillQuery on the AxiomV2Query contract.
  • Onchain: verify zk proof onchain, check hashes, confirm mathes original query
  • Calls the callback specified by the AxiomV2Callback in step 1
  1. Callback runs
  • This allows a custom contract to make use of the results of the query and run custom logic
  • In the Airdrop example the AutonomousAirdrop.sol contract validates the relevant airdrop requirements and issues the token if met

When testing locally the QueryFulfillment in step 3 will not be possible which would block testing of the custom logic implemented in the callback used in step 4. That’s where the AxiomTest library can be used.

Step By Step Testing

Following AutonomousAirdrop.t.sol can show us step by step how to use AxiomTest and allows us to investigate what is going on.

Importing

AxiomTest follows the same convention as a usual Foundry Test but instead we import AxiomTest.sol and inherit from AxiomTest in the test contract:

import { AxiomTest, AxiomVm } from "@axiom-crypto/v2-periphery/test/AxiomTest.sol";

contract AutonomousAirdropTest is AxiomTest { ...

Setup

setUp() is also the same as Foundry, an optional function invoked before each test case is run. Here there’s a bit more going on:

function setUp() public {
    _createSelectForkAndSetupAxiom("sepolia", 5_103_100);
    
    inputPath = "app/axiom/data/inputs.json";
    querySchema = axiomVm.compile("app/axiom/swapEvent.circuit.ts", inputPath);

    autonomousAirdrop = new AutonomousAirdrop(axiomV2QueryAddress, uint64(block.chainid), querySchema);
    uselessToken = new UselessToken(address(autonomousAirdrop));
    autonomousAirdrop.updateAirdropToken(address(uselessToken));
}

_createSelectForkAndSetupAxiom is found in the AxiomTest.sol contract. It basically initialises everything Axiom related on a local fork so the tests can be run locally.

  1. Setup and run a new local fork using vm.createSelectFork(urlOrAlias, forkBlock) docs;
  2. Using provided chainId find the addresses for axiomV2Core and axiomV2Query from local AxiomV2Addresses. These are actual deployments and currently only exist on mainnet/sepolia.
  3. Initialise core and query contracts using the addresses and interfaces:
axiomV2Core = IAxiomV2Core(axiomV2CoreAddress);
axiomV2Query = IAxiomV2Query(axiomV2QueryAddress);
  1. Initialise axiomVm
axiomVm = new AxiomVm(axiomV2QueryAddress, urlOrAlias, true);

AxiomVm.sol implements the cheatcode functionality as well as providing utility functions for compiling, proving, parsing args, etc.

Following initialisation of the fork, the axiomVm compile function is used to compile the local circuit and retrieve the querySchema associated to the circuit. The querySchema provides a unique identifier for a callback function to distinguish the type of compute query used to generate the query results passed to the callback and this is used as a constructor argument when creating a new AutonomousAirdrop contract.

Behind the scenes compile is using Foundry FFI to run the Axiom CLI compile command:

npx axiom circuit compile _circuitPath --provider vm.rpcUrl(urlOrAlias) --inputs inputPath --outputs COMPILED_PATH --function circuit --mock

This outputs a JSON file which contains the querySchema. This value is parsed from the file and returned.

Testing SendQuery

The test test_axiomSendQuery covers step 1 in the System Overview above.

function test_axiomSendQuery() public {
    AxiomVm.AxiomSendQueryArgs memory args =
        axiomVm.sendQueryArgs(inputPath, address(autonomousAirdrop), callbackExtraData, feeData);

    axiomV2Query.sendQuery{ value: args.value }(
        args.sourceChainId,
        args.dataQueryHash,
        args.computeQuery,
        args.callback,
        args.feeData,
        args.userSalt,
        args.refundee,
        args.dataQuery
    );
}

Looking at AxiomVm sendQueryArgs we see it is again using Axiom CLI. This time via the functions _prove and _queryParams.

_prove runs the prove command:

npx axiom circuit prove circuitPath --mock --sourceChainId vm.toString(block.chainid) --compiled COMPILED_PATH --provider vm.rpcUrl(urlOrAlias) --inputs inputPath --outputs OUTPUT_PATH --function circuit

This will prove the previously compiled circuit and generate an JSON output file with the interface:

{
    sourceChainId: string,
    computeResults: string[], // bytes32[]
    computeQuery: AxiomV2ComputeQuery,
    dataQuery: DataSubquery[],
}

_queryParams then runs the query-params command:

npx axiom circuit query-params vm.toString(callbackTarget) --sourceChainId vm.toString(block.chainid) --refundAddress vm.toString(msg.sender) --callbackExtraData vm.toString(callbackExtraData) --maxFeePerGas vm.toString(feeData.maxFeePerGas) --callbackGasLimit vm.toString(feeData.callbackGasLimit) --provider vm.rpcUrl(urlOrAlias) --proven OUTPUT_PATH --outputs QUERY_PATH --args-map

This uses the output generate by the prove step (at OUTPUT_PATH) and generates the sendQuery arguments to a JSON file in the format:

{
    value: bigint,
    queryId: bigint,
    calldata: string,
    args,
}

This file is read and the args are returned as a string which are parsed in _parseSendQueryArgs and returned as a AxiomSendQueryArgs struct.

Finally sendQuery itself is called on the axiomV2Query contract initialised during setup using the parsed args.

Testing Callback

The test test_axiomCallback mocks step 3 in the System Overview and allows the callback to be tested.

function test_axiomCallback() public {
    AxiomVm.AxiomFulfillCallbackArgs memory args =
        axiomVm.fulfillCallbackArgs(inputPath, address(autonomousAirdrop), callbackExtraData, feeData, SWAP_SENDER_ADDR);
    
    axiomVm.prankCallback(args);
}

Similar to the previous test fulfillCallbackArgs uses the Axiom CLI to prove and queryParams to generate the required args for AxiomFulfillCallbackArgs. These are used in prankCallback to call the axiomV2Callback function on the AutonomousAirdrop contract (args.callbackTarget is the address) with the relevant spoofed Axiom results:

IAxiomV2Client(args.callbackTarget).axiomV2Callback{gas: args.gasLimit}(
    args.sourceChainId,
    args.caller,
    args.querySchema,
    args.queryId,
    args.axiomResults,
    args.callbackExtraData
);

The axiomV2Callback function is inhertied from the AxiomV2Client and this function in turn calls _validateAxiomV2Call and _axiomV2Callback.

Conclusion

Following through these tests and libraries really helps to understand the moving parts in the Axiom system and hopefully the post helps others. Its exciting to see what gets built with Axiom as it becomes another core primitive!

Photo by David Travis on Unsplash

Buidler, Waffle & Ethers

Lately at Balancer we’ve moved from the Truffle development environment to using Buidler, Waffle and Ethers. The main benefit is being able to use console.log in Solidity during debugging – it’s amazing how much of a difference this makes and for this alone the change over is worth it. Here’s some notes I made during the switch over.

Ethers

The ethers.js library aims to be a complete and compact library for interacting with the Ethereum Blockchain and its ecosystem.

Documentation is here: https://docs.ethers.io and this Web3.js vs Ethers.js guide was useful.

The following gist demonstrates some basic usage of Ethers that creates an instance of a deployed contract and then running some calls against it:

Buidler & Waffle

Buidler is described as a ‘task runner’. I think its easiest to see it as a swap for Truffle/Ganache. It has lots of different plugins that make it really useful and its documentation was refreshingly good.

The Quickstart shows you how to install and how to run common tasks. It also uses Waffle for testing. Waffle is a simple smart contract testing library built on top of Ethers.js. Tests in Waffle are written using Mocha alongside with Chai and from my experience everything just worked. The docs are here. And its worth digging in to see some of the useful things it offers such as Chai Matchers which allow you to test things like reverts, events, etc.

Buidler commands I found I used a lot:

  • Run the local Buidler EVM: $ npx buidler node
  • Compile project contracts: $ npx buidler compile
  • Run tests: $ npx buidler test ./test/testfile.ts

Here’s an example test file I used that demonstrates a few useful things:

Static Calls

let poolAddr = await factory.callStatic.newBPool(); – The contract callStatic pretends that a call is not state-changing and returns the result. This does not actually change any state and is free.

Connecting Different Accounts

await _pools[1].connect(newUserSigner).approve(PROXY, MAX); – Using contract connect(signer) calls the contract via the signer specified.

Gas Costs

await proxy.connect(newUserSigner).exitswapExternAmountOut(
            _POOLS[1],
            MKR,
            amountOut,
            startingBptBalance,
            {
              gasPrice: 0
            }
        );

Setting the gasPrice to 0 like above allows me to run the transaction without spending any Eth on it. This was useful when checking Eth balance changes without having to worry about gas costs.

Custom accounts & balances

const config: BuidlerConfig = {
  solc: {
    version: "0.5.12",
    optimizer: {
      enabled: true,
      runs: 200,
    },
  },
  networks: {
    buidlerevm: {
      blockGasLimit: 20000000,
      accounts: [
        { privateKey: '0xPrefixedPrivateKey1', balance: '1000000000000000000000000000000' },
        { privateKey: '0xPrefixedPrivateKey2', balance: '1000000000000000000000000000000' }
      ]
    },
  },
};

I needed the test accounts to have more than the 1000Eth balance set by default. In buidler.config.ts you can add accounts with custom balances like above.

Deploying

Deploying is done using scripts. First I updated my buidler.config.ts with the account/key for Kovan that will be used to deploy (i.e. must have Eth):

const config: BuidlerConfig = {
  solc: {
    version: "0.5.12",
    optimizer: {
      enabled: true,
      runs: 200,
    },
  },
  networks: {
    buidlerevm: {
      blockGasLimit: 20000000,
    }
    kovan: {
      url: `https://kovan.infura.io/v3/${process.env.INFURA}`,
      accounts: [`${process.env.KEY}`]
    }
  },
};

Then I wrote a deploy-script.js:

async function main() {
  // We get the contract to deploy
  const ExchangeProxy = await ethers.getContractFactory("ExchangeProxy");
  const WETH = '0xd0A1E359811322d97991E03f863a0C30C2cF029C';
  const exchangeProxy = await ExchangeProxy.deploy(WETH);

  await exchangeProxy.deployed();

  console.log("Proxy deployed to:", exchangeProxy.address);
}

main()
  .then(() => process.exit(0))
  .catch(error => {
    console.error(error);
    process.exit(1);
  });

Then run this using: npx buidler run --network kovan deploy-script.js

🎉 Console Logging 🎉

One of the holy grails of Solidity development and so easy to setup in this case! There are also Solidity stack traces and error messages but unfortunately there was a bug that caused this not to work for our contracts.

To get this going all you need to do is add: import "@nomiclabs/buidler/console.sol"; at the top of your contract then use console.log. More details on what kind of outputs, etc it supports are here. Lifesaver!

Hope some of this was helpful and you enjoy using it as much as me.

(Photo by Kevin Jarrett on Unsplash)

NuCypher & Proxy Re-encryption

Photo by Joshua Sortino on Unsplash


In April I entered (and won!) the NuCypher+CoinList hackathon. I didn’t actually know much about the NuCypher tech before I got started but once I had built my DApp it was clear this is really interesting stuff and it’s stuck with me ever since as something interesting to build on.

Proxy Re-encryption

The NuCypher solution will eventually provide a decentralised privacy infrastructure but during the hackathon I was mainly making use of a subset of the tech, Proxy Re-encryption.

Proxy re-encryption is a set of encryption algorithms that allow you to transform encrypted data. Specifically… it allows you to re-encrypt data — so you have data that’s encrypted under one set of keys, you can re-encrypt the data without de-encrypting it first, so that now it’s encrypted under a second, different set of keys —NuCypher co-founder MacLane Wilkison

So What?

To understand why this is pretty awesome imagine I have some encrypted data I want to share with Bob, what are the options to do this?

Crazy way – I just give me private encryption key to Bob (who I’m sharing the data with) who can use it to decrypt the data. But now Bob has my key and who knows where this ends up.

Inefficient way – I decrypt the encrypted data then rencrypt it using Bobs public key. This is more secure for sure but I have to do a lot more work. What if I have to do this many times? What if the encrypted data is stored and accessed over a network? Hows the information all being shared? Intensive!

How about the Proxy Re-encryption way:

With Proxy Re-encryption I encrypt the data once.

The encrypted data can be stored anywhere — Amazon, Dropbox, IPFS, etc. I only need to upload it once and provide access to the Proxy service (eventually this will be a NuCypher decentralised service)

The Proxy can rencrypt the data for anyone else I choose (provided I have their public key) efficiently and without ever having access to the decrypted data.

Bob decrypts the data using his own key and resources.

If the data I’m sharing is a stream, i.e. a Twitter feed, then I can enable/revoke decryption access whenever I want — i.e. I can stop someone seeing the data.

NuCypher will eventually provide a decentralised privacy infrastructure which will replace a centralized proxy with a decentralized network. A really good overview of the NuCypher solution is here.

Combine all this with decentralised smart contract as a source of access — very cool!

My DApp — thisfeedisalwaysforsale

My DApp was innspired by Simon de la Rouvieres This Artwork Is Always On Sale where he implements a Harberger Tax on the ownership of a digital artwork. In my app, instead of an artwork, access to a feed of data is always for sale. NuCypher is used to encrypt the data and only the current Patron can decrypt (using NuCypher) to get access. Anyone can buy this access from the current Patron for the sale price set when they took ownership. Whilst they hold ownership they pay a 5% fee to the feed owner. In the demo app the data is a Twitter like feed but the concept could be extended to have more than one Patron and could also be used for other kinds of feed data such as sensor data, camera/video feeds, music, etc.

I was super happy to get a mention in Token Economy as Stefanos favourite entry!

Ethereum — Vyper Development Using Truffle

Why Vyper?

Vyper is a contract-oriented, pythonic programming language that targets the Ethereum Virtual Machine (EVM)

Vyper is a relatively new language that has been written with a focus on security, simplicity and audibility. It’s written in a Pythonic way which appeals to me and as a more secure alternative to Solidity I think it has a lot of potential. I plan on writing more about working with Vyper in the future.

Truffle — Too Much Of A Sweet Tooth?

I’ve recently finished working on a hackathon project and completed the 2018 ConsenSys Academy and during that time, for better or worse, I’ve become pretty accustomed to using the Truffle development environment for writing code, testing and deploying— it just makes life easier.

So, in an ideal world I’d like to use Truffle for working with Vyper. After a bit of investigation I found this ERC721 Vyper implementation by Maurelian who did the work to make it Truffle compatible. I thought it might be useful to document the build process for use in other projects.

How To — Vyper Development Using Truffle

Install Vyper

The first step is to make sure Vyper is installed locally. If this has been done before you can skip — you can check by running the $ vyper -h command. There are various ways to install, including using PIP, the docs are here. I’m using a Mac and did the following:

Set up virtual environment:

$ virtualenv -p python3.6 --no-site-packages ~/vyper-venv

Remeber to activate the environmet:

$ source ~/vyper-venv/bin/activate

Then in my working dir:

$ git clone https://github.com/ethereum/vyper.git
$ cd vyper
$ make
$ make test

Install Truper

Next I installed Truper, a tool written by Maurelian to compile Vyper contracts to Truffle compatible artifacts. It uses Vyper which is why we installed it previously. (See the next section for details of what it’s doing). To install run:

$ npm i -g truper

Compiling, Testing, Deploying

From your project dir (you can clone the ERC-721 project for a quick test).

Run ganache test network:

$ ganache-cli

Compile any Solidity contracts as usual using:

$ truffle compile

Compile Vyper contracts using the command:

$ truper
* this must be called from the project dir and you must have the virtual environment you built Vyper in running.

Truffle tests can be written and run the usual way, i.e.:

Use artifacts in test files:
const NFToken = artifacts.require('NFToken.vyper');
Run tests using:
$ truffle test

Truffle migrations also work the usual way. For example I used the following migration file to deploy to ganache:

2_deploy_contracts.js
const NFToken = artifacts.require('NFToken.vyper');
const TokenReceiverMockVyper = artifacts.require('NFTokenReceiverTestMock.vyper');
module.exports = function(deployer) {
  deployer.deploy(NFToken, [], []);
  deployer.deploy(TokenReceiverMockVyper);
};
$ truffle migrate

What’s Going On

Truper uses Vyper which is why we installed it in the first step. If we look at https://github.com/maurelian/truper/blob/master/index.js we can see Truper is creating Truffle artifact files for each Vyper contract and writing them to the ./build/contracts folder of the project.

Truffle Artifact Files

These *.json files contain descriptions of their respective smart contracts. The description includes:

  • Contract name
  • Contract ABI (Application Binary Interface — a list of all the functions in the smart contracts along with their parameters and return values). Created by Truper using: $ vyper -f json file.vy
  • Contract bytecode (compiled contract data). Created by Truper using: $ vyper -f bytecode file.vy
  • Contract deployed bytecode (the latest version of the bytecode which was deployed to the blockchain). Created by Truper using: $ vyper -f bytecode_runtime file.vy
  • The compiler version with which the contract was last compiled. (Doesn’t appear to get added until deployed.)
  • A list of networks onto which the contract has been deployed and the address of the contract on each of those networks. (Doesn’t appear to get added until deployed.)

Maurelian describes it as a hacky stop-gap but it works so thank you!

Progress

Well that’s been a fun and productive couple of months!

ConsenSys Academy 2018

I’m now officially a ConsenSys certified dApp Developer 👊! (Certificate apparently on its way)

The ConsenSys Developer course was definitely worthwhile. I covered a lot of Blockchain theory while following the course lectures and taking the quizzes. The real learning and fun came from the final project where I actually had to build something.

ConSensys Academy Final Project

My final project was a bounty DApp that allows anyone to upload a picture of an item they want identified along with an associated bounty in Eth for the best answer. I got a lot of experience using the various parts of the Web3 technology stack. I used Truffle for development/testing, IPFS for storing the pictures and data (was cool to use this, very powerful idea), uPort for identity, OpenZeppelin libraries (which are really useful) an upgradeable design pattern, deployment to Rinkeby and lots of practice securing and testing smart contracts.

Colony Hackathon Winner

I also managed to bag myself a prize in the Colony Hackathon for my decentralised issue reporting app. I got the Creativity Honorable Mention which was pretty cool and I used my winnings to buy a Devcon IV ticket ✈️ 🤘!!

The Learnings

I came across a few things that I wanted to do while I was #BUIDLING but couldn’t easily find the info on so I’ve been keeping a kind of cheat sheet. Hopefully it might help someone else out there.

https://github.com/johngrantuk/dAppCheatSheet/blob/master/README.md

The Future Is Bright

The last few months I’ve confirmed to myself that the Blockchain/Ethereum world is something I want to be involved in. There’s so many different, exciting areas to investigate further, now I just have to chose one and dive further down the rabbit hole!

DApp Learnings  –  Storing & Iterating a Collection

I’ve been working on a rock, paper, scissors Ethereum DApp using Solidity, Web3 and the Truffle framework. I hit a few difficulties trying to replicate functionality that would normally be trivial in a non blockchain world so I thought I’d share what I learned.

My first thoughts for the DApp was to display a list of existing games that people had created. Normally if I were doing something like this in Django I’d create a game model and save any new games in the database. To display a list of existing games on the front end I’d query the db and iterate over the returned collection. (I realise storage is expensive when using the Ethereum blockchain but I thought trying to replicate this functionality would make sense and would be a good place to start.)

Solidity

Structures

While investigating the various data types that could be used I found the Typing and Your Contracts Storage page from Ethereum useful. I settled on using a struct, a grouping of variables, stored under one reference.

struct Game {
   string name;
   uint move;
   bool isFinished;
   address ownerAddress;
   uint stake;
   uint index;
}

That handles one game but I want to store all games. I attempted to do this in a number of different ways but settled on mapping using the games index as the key. Every time a new game is added the index is incremented so I also use gameCount to keep count of the total games.

mapping (uint => Game) games;
uint gameCount;

struct Game {
        string name;
        uint move;
        bool isFinished;
        address ownerAddress;
        uint stake;
        uint index;
    }

To add a new game I used this function:

function StartGame(uint moveId, string gameName) payable {
      require(moveId >= 0 && moveId <= 2);
      games[gameCount].name = gameName;
      games[gameCount].move = moveId;
      games[gameCount].isFinished = false;
      games[gameCount].ownerAddress = msg.sender;
      games[gameCount].stake = msg.value;
      games[gameCount].index = gameCount;
      gameCount++;
}

I also added a function that returns the total number of games:

function GetGamesLength() public returns (uint){
   return gameCount;
}

Returning A Structure

Next I want to be able to get information about a game using it’s index. In Solidity a structure can only be returned by a function from an internal call so for the front end to get the data I had to find another way. I went with the suggestion here — return the fields of the struct as separate return variables.

function GetGame(uint Index) public returns (string, bool, address, uint, uint) {
    return (games[Index].name, games[Index].isFinished, games[Index].ownerAddress, games[Index].stake, games[Index].index);
}

Front End

On the front end I use Web3 to iterate over each game and display it. To begin I call the GetGamesLength() function. As we saw previously this gives the total number of games. Then I can iterate the index from 0->NoGames to get the data for each game using the GetGame(uint Index) function.

When my page first loads it calls:

getGames: function() {
    var rpsInstance;
    App.contracts.RpsFirst.deployed().then(function(instance) {
      rpsInstance = instance;
      return rpsInstance.GetGamesLength.call();
    }).then(function(gameCount) {
      App.getAllGames(web3.toDecimal(gameCount), rpsInstance);
    }).catch(function(err) {
      console.log(err.message);
    });
  },

Web3 – Promises, Promises & more Promises…

The getAllGames function calls GetGame(uint Index) for each game. To do this I created a sequence of promises using the method described here:

getAllGames: function(NoGames, Instance){
   
   var sequence = Promise.resolve()

   for (var i=0; i < NoGames; i++){(function(){  
         var capturedindex = i
         sequence = sequence.then(function(){
            return Instance.GetGame.call(capturedindex);
         }).then(function(Game){
            console.log(Game + ' fetched!'
            // Do something with game data. 
            console.log(Game[0]); // Name
            console.log(Game[1]); // isFinished
         }).catch(function(err){
            console.log('Error loading ' + err)
         })
      }())
   }
}

Conclusion

Looking back at this now it’s all pretty easy looking but it took me a while to get there! I’m still not even sure if it’s the best way to do it. Any advice would be awesome and if it helps someone even better.

Python Map Plotting Using Cartopy

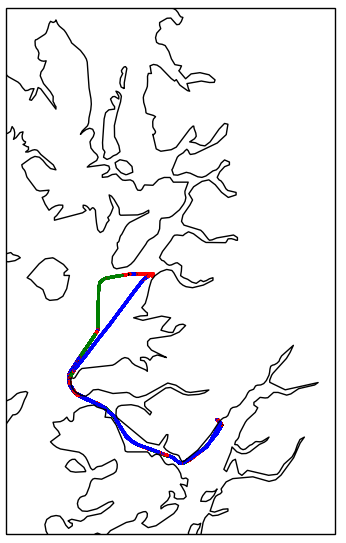
Cartopy Plot of Scotland

Recently I’ve been using Python and Cartopy to plot some Latitude/Longitude data on a map. Initially it took some time to figure out how to get it to work so I thought I’d share my code incase it was useful.

According to the Cartopy intro it is

“a Python package designed to make drawing maps for data analysis and visualisation as easy as possible.”

I’m not sure how active the project is and I found the documentation a bit lacking but once I was up and running it was pretty easy to use and I think the results look pretty good.

Plotting My Data

I have a csv file with various data timestamped and saved on each line. For this case I was interested in the lat/lng location, signal strength (for an antenna) and also a satellite number. An example of one line of data is:

2017–07–10 22:31:59:203,Processing UpdatePacket: [‘:’, ‘1’, ‘0’, ‘0’, ‘1’, ‘0’, ‘0’, ‘1.63’, ‘17.15’, ‘246.57’, ‘114.11’, ‘57.008263’, ‘-5.827861’, ‘310.00’, ‘1’, ‘NAN’, ‘0’, ‘2’, ‘0’, ‘c\n’]

and from that the information I require is:

lat/lng position: 57.008263,-5.827861
signal strength: 1.63
satellite number: 310.00

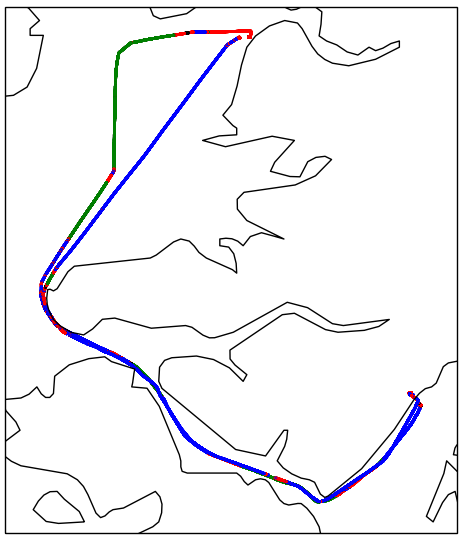
Initially for each lat/lng position I wanted to plot the point on a map and colour the marker at that point to show which satellite number it was. Also if the signal strength was -100 the marker colour should be shown as red. An example taken from some of the data is shown below.


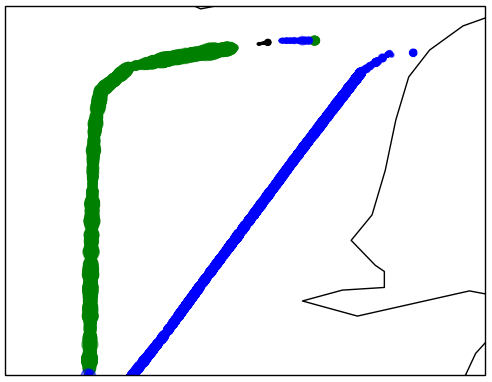
Lat/Lng Plots with different zoom level

The following Gist shows the Python script I used:

Script Details

Most of the script is actually concerned with reading the file and parsing the relevant data. The main plotting functionality is in the section:

ax = plt.axes(projection=ccrs.Mercator()) # Map projection
ax.coastlines(resolution=’10m’)           # Adds coastline to map at highest resolution

plt.scatter(lngArr, latArr, s=area, c=satLngArr, alpha=0.5, transform=ccrs.Geodetic())                # Plot
plt.show()

The projection sets the coordinate system and is selected from the Cartopy projection list (there’s a lot to pick from and I chose the one I thought looked the best).

Next a coastline is added to the projection. As I was focusing on a small section of Scottish coastline I went with the 10m resolution which is the highest but lower resolutions can be selected as detailed in the documentation.

Finally a scatter plot is created. The data has been parsed into equal sized lists of longitude and latitude points.

The ‘s’ parameter defines the size of the marker at each point, in this case all set to 1pt radii.

The ‘c’ parameter defines the colour of the marker, in this case blue for satellite 310, green for 60, yellow for 302, black for any other satellite and red if signal strength is -100.

Finally the transform=ccrs.Geodetic() sets the lat/lng coordinate system as defined here.

Scaling Marker Size

It’s also possible to adjust the radius of the marker at each point. To scale it relative to the signal strength (I removed the -100 strengths):

area = np.pi * (strengthNpArray)**2

Which gives:


Marker scaled to strength at point

Scotcoin

Earlier this week I attended the Scotcoin & the blockchain meetup at Napier University. It was a Q&A session, there must have been around 25 people there and it was an informative and interesting evening.

The two Scotcoin representatives were approachable and enthusiastic and seemed genuinely pleased to host the meetup and field the questions. The attendees were a mixed bag of crypto geeks, anti-establishmenters and nationalists. Some with pretty passionate opinions they weren’t scared to show.  It led to a pretty entertaining interaction. In a way I think the mix of people reflected the mixed Scotcoin vision.

Scotcoin was initially conceived during the build up to the 2014 Scottish Independence Referendum. At this time it was unclear what the currency situation would be if Scotland went independent and Scotcoin was a potential solution. As an ambitious, alternative solution to the currency issue I think it was quite smart (although I doubt the Scottish Government would have had the vision or courage to implement it).

However, Scotland didn’t become independent…The original Scotcoin founder left the project and a new investor/team took over. At that point I think it became less an idealistic vision and more like a way for some people to make money. -which is fair enough.

Nevertheless, according to the Business Model Canvas, a successful product must:

“Provide value to the customer by resulting in the solution of a problem the customer is facing or providing value to the customer.”

Without the need for an alternative to the GBP Scotcoin no longer seems to meet these requirements.

The official project line was that “Scotcoin will grow the Scottish economy by offering small business owners benefits.” When questioned on what those benefits are the only one suggested was lower transaction fees – a benefit that more established cryptocurrencies like Bitcoin (which Scotcoin is basically modelled on) already provide.

There was mention of the development of other features, but these couldn’t be discussed and I struggle to see the team having enough talent or vision to truly innovate. Whilst I hope the project doesn’t fail, for now, like a lot of crypto projects out there I think it’s mainly fueled on pure speculation.

Antenna Arrays And Python – The Array (finally!)

As mentioned in my intro post an array antenna is a set of individual antennas connected to work as a single antenna. So far we’ve covered the individual antennas, i.e. the square patches, now it’s time to look at how they can be connected to work together.

Array Factor Fun

You can’t get far digging into arrays before you come across the Array Factor. It looks complicated but to me the easiest way to think of it is that it combines every elements position, radiating amplitude and radiating phase to give the overall array performance.

The Array Factor demonstrates that by altering an element, such as its position or phase, we can alter the arrays properties. For example the arrays beam could be steered to a desired position by altering the phase of each element.

The Array Factor is given by:

Where:

θ, φ = Direction from origin

N = number of elements

An= Amp of element

βn = Phase of element in rads

k0 = 2π/λ rads/m

And:

is the relative phase of incident wave at element n located at xn, yn, zn.

Array Factor in Python

The script below shows how easy it is to calculate the Array Factor in Python:

Array Radiation Pattern, Directivity & Gain

The above Array Factor equation is independent of each elements individual radiating pattern. The overall radiation pattern of an array is determined by the array factor combined with the radiation pattern of each element, Fn(θn, φn), giving:

The overall radiation pattern results in a certain directivity and thus gain linked through the efficiency as discussed previously.

Some Examples

To demonstrate the effects the individual element patterns have on the overall array performance we can investigate some examples using Python.

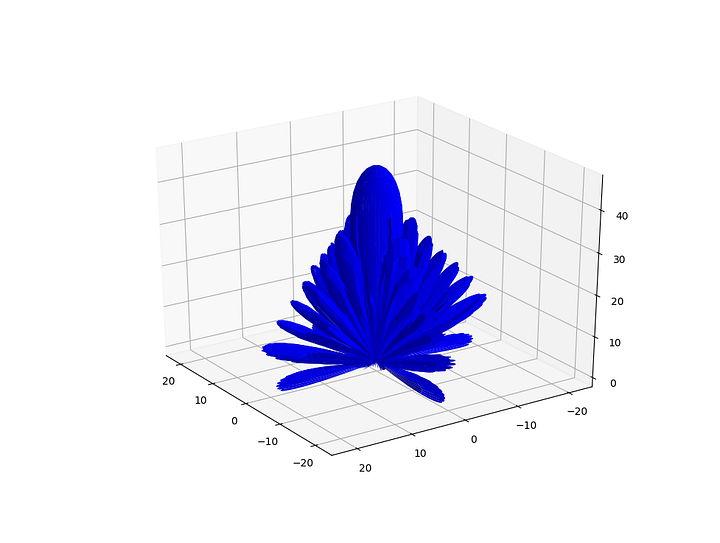
Isotropic antenna elements

In this case each element radiates equally in all directions so Fn(θn, φn) is the same for each θn, φn. The antenna radiation pattern is now just the Array Factor as described in the code above.

15×15 Array of Isotropic Elements

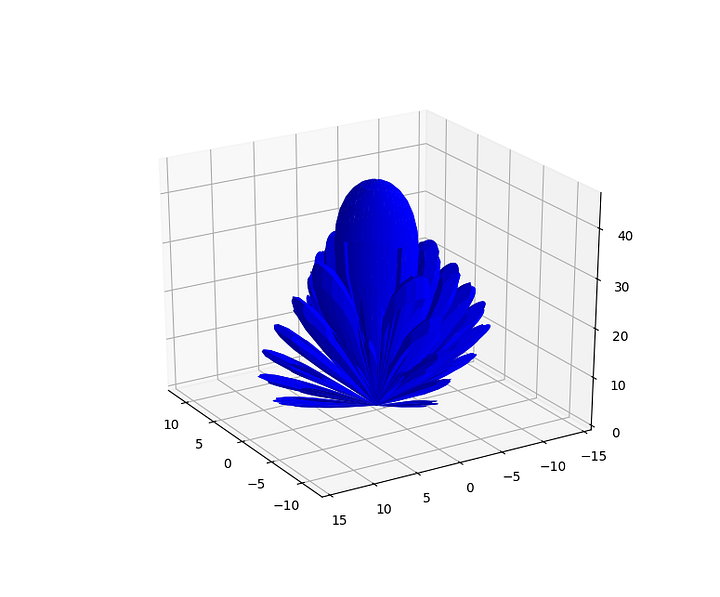
Patch antenna elements

Using elements described by the PatchFunction discussed previously:

PatchFunction(θ, φ, Freq, 10.7e-3, 10.47e-3, 3e-3, 2.5)
15×15 Array of patches

Python script for patch array:

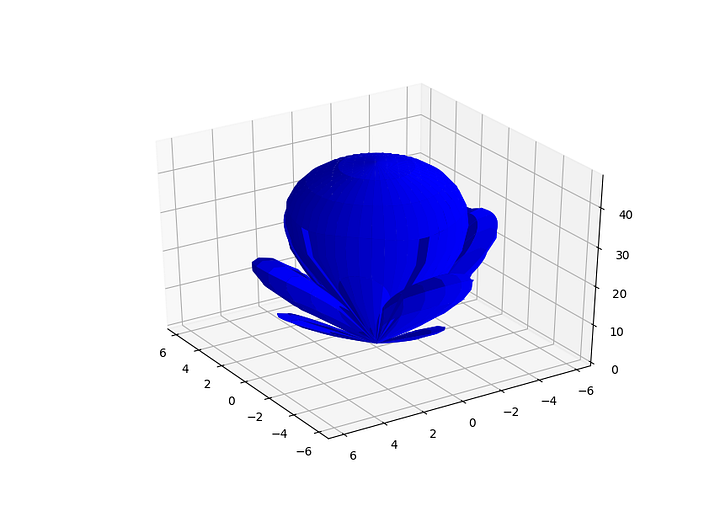
Horn antenna elements

And finally using horn antenna elements represented by cos²⁸(θ) function.

15×15 Array of cos²⁸(θ) Horns

Python script for horn array:

Next time we can see how to calculate an elements phase to steer the beam.

Antenna Arrays And Python – Patch Efficiency & Gain

Last post I dealt with antenna directivity, this post discusses antenna gain which is closely related.

Gain combines an antennas directivity and efficiency to describe how good it is at sending/receiving power in a direction. This is useful for things like link budget analysis which basically calculates if two antennas can communicate.

Antenna Gain, G, can be calculate from the directivity, D, and antenna efficiency, εr by:

The efficiency of an antenna describes how well the input power is radiated by the antenna (and due to reciprocity receive efficiency is the same as transmit efficiency):

A high efficiency antenna will radiate most of the input power while a low efficiency antenna will lose a lot of the input power before it is radiated due to things like dielectric loss, impedance mismatch, etc.

Patch Efficiency

The Python script at the bottom of the post is based on the ArrayCalc calc_patchr_eff.m file and defines a function, CalculatePatchEff, that calculate the efficiency of a rectangular patch based on the patch dimensions and materials. The comments provide some example material properties and the main function has some examples that demonstrate the effects of the material selection on the efficiency:

FR4 Patch, 14GHz, Efficiency = 47.27%

RO4350 Patch, 14GHz, Efficiency = 62.32%

Python Script