TLDR: EIP-7702 allows externally owned accounts to temporarily behave like smart contract wallets during a transaction, enabling them to use smart contract features like batching and gas sponsorship without permanently changing the account type. BUT Wallet/RPCs control the auth flow not apps and not all wallets have EIP-7702 support.
EIP-7702 Overview
EIP-7702 introduces a new transaction type, 0x04, in Ethereum’s Pectra upgrade that enables externally owned accounts (EOAs) to execute temporary smart contract functionality.
The delegation process looks like:
A Smart Contract should exist that the EOA can designate to
The EOA signs an Authorization to designate the contract to the account
An EIP-7702 transaction is sent along with the Authorization
When processed, the network records that this EOA should delegate to the specific smart contract
The EOA appears to have the SC code attached to it directly
The code will be valid until replaced by another authorization
msg.sender in these transactions remains the EOA’s address
Wallets Are In Control
Applications cannot directly use EIP-7702 to delegate user accounts to their preferred smart accounts.
Internal tests written to use an inject browser wallet as the Viem account throws because it is not possible to sign an authorization over JSON-RPC right now: https://github.com/wevm/viem/discussions/3285
Although its technically possible for any entity to create an EIP-7702 authorization, wallet providers have made it clear that they will reject transactions containing authorization fields from applications. Instead, wallets will manage EIP-7702 authorizations themselves, upgrading their users to the wallet’s chosen smart account implementation. There will be fragmentation as different wallets adopt different implementations.
Worth noting EIP-5792 can be used to query what capabilities a wallet supports using rpc calls (see 7702beat and 7702 checker as examples of existing tools).
In this post, we’ll walk through the lifecycle of a swap in Balancer V3, using the recently released MEV hook as our lens. We’ll trace how a swap flows through the system — from the initial call to the final token transfers — highlighting the key steps and components along the way.
One of the standout strengths of Balancer V3 is how much heavy lifting it does for you. As a developer, you can focus on building your core logic — whether that’s a novel pool type or a specialised hook — without needing to reinvent the plumbing. The core swap flow is already implemented, audited, and optimised. This lets you move fast, stay safe, and build confidently on top of the protocol.
Anatomy of a Balancer V3 Swap
Before diving into the code, it’s useful to understand the main contracts involved in a swap. Balancer V3 separates responsibilities across a few key components, allowing developers to focus only on the parts they need to customise.
The diagram below outlines the four primary contracts involved and their roles in the flow. While the Router and Vault handle most of the core logic — routing, fund management, and safety checks — the Pool and Hook are the only contracts where your custom logic lives.
Primary Contracts Used During Swaps
Digging Into the Swap Flow: Code Highlights
Now that we have an understanding of the contracts involved in a Balancer V3 swap, let’s take a closer look at the code. In this section, we’ll walk through key parts of the swap flow, highlighting how each piece fits into the larger system and where the MEV hook plays a role.
The user initiates the swap by interacting with the protocol through a Router, rather than directly engaging with the Vault. This approach abstracts away some of the complexity, simplifying the user experience. In this case, the Balancer Router contract is used, and the swapSingleTokenExactIn function is called to execute the swap:
User interact with Router
The parameters passed to the swapSingleTokenExactIn function specify key swap details, including the pool, tokens, and the amount to be swapped. At this stage, the amounts are “raw”—they are scaled to the relevant token decimals but do not yet account for any rate adjustments or slippage. For example, if the user wanted to swap 1 USDC, the exactAmountIn would be 1000000 (reflecting the 6 decimal places of USDC).
It’s also important to note that at this point, the Vault is unlocked, meaning that the transient accounting state has been initiated and any subsequent actions must result in balanced accounting.
Inside the Router contract, the actual interaction with the Vault happens within the _swapHook function. This is where the Router forwards the swap request by calling _vault.swap(...), passing along the relevant parameters:
Router calls Vault swap
Inside the Vault’s swap function, the first major step is preparing the data needed to execute the swap. This involves loading the current state of the pool and converting raw token amounts into “live” values that reflect current scaling factors, rates, and fees.
Preparing for the Swap in the Vault
What’s happening here:
poolData: Captures the current state of the pool, including both raw and scaled balances, token rates, and scaling factors.
swapState: Derives token indices, applies scaling to the input amount, and loads the static swap fee for the pool.
poolSwapParams: Bundles all of the data required to compute the swap, with every value already adjusted to use “live” scaling.
At this point, the Vault has everything it needs to perform accurate swap calculations based on real-time conditions.
At this stage in the Vault’s swap function, any beforeSwap hook would typically be executed if configured. However, in the case of the MEV hook, this step is not used.
What is relevant here is the dynamicSwapFee hook, which is called to allow the hook contract to specify a dynamic fee based on the current context:
Calling the Hook to get SwapFee
This check ensures that the pool has a dynamic fee hook configured. If it does, the Vault delegates to the hook via HooksConfigLib, allowing custom logic to influence the swap fee before the main calculation proceeds.
Execution now enters the MevCaptureHook contract. The HooksConfigLib calls the onComputeDynamicSwapFeePercentage function, allowing the hook to define a custom fee based on the current context:
Inside the Hook — Custom Fee Logic
This is where developers can begin implementing their own logic. In the MEV hook, the function does the following:
Checks if MEV tax is enabled — If not, it simply returns a static fee.
Checks if the sender is exempt from fee — If so, it returns a static fee. Note the use of isTrustedRouter here, which ensures the Router is correctly forwarding the original sender. This helps enforce that only legitimate callers are considered for fee exemption.
Calculates the MEV-specific swap fee — This is based on configurable parameters and market context.
The actual fee calculation is handled in the _calculateSwapFeePercentage function. While we won’t dive into every detail of the MEV logic, it’s a great example of how hooks can introduce dynamic, context-aware behaviour into the swap flow. In this case, the hook adjusts the swap fee based on gas conditions to protect users from MEV exploitation.
Dynamic Fee Calculation Logic in the MEV Hook
This function dynamically adjusts the swap fee based on the priority gas price — the difference between the transaction’s gas price and the block’s base fee.
Base Conditions:
If the priority gas price is below the configured threshold (suggesting a retail user), the function returns the standard static fee.
If the maximum MEV fee cap is less than or equal to the static fee, it also returns the static fee.
Dynamic Fee Calculation:
For transactions with a priority gas price above the threshold, the function computes a fee increment.
The increment is calculated as: (priorityGasPrice - threshold) * multiplier / 1e18
This increment is then added to the static swap fee percentage.
Safety Mechanisms:
The function uses OpenZeppelin’s Math.tryMul to guard against overflow.
If an overflow is detected, it gracefully falls back to the maximum allowed MEV fee.
The final result is always capped at the maximum MEV swap fee percentage.
Once calculated, this dynamic fee is returned to the Vault, where it’s used in the next phase of the swap — starting with the fee deduction:
Continuing the swap: Applying the fee
In this example, we’re following an EXACT_IN type swap. That means the swap fee is deducted from the input amount provided by the user. For an EXACT_OUT swap, the fee would instead be taken from the amount calculated.
After applying the swap fee, the Vault calls the pool’s onSwap hook. This is the entry point for pool-specific logic — each pool type (Weighted, Stable, etc.) defines its own math to calculate how much of the output token to return for a given input.
Pool Swap Logic
The onSwap function returns the calculated amount, still in live-scaled form, meaning it reflects the token’s rate and scaling factors.
Once the amount is scaled back to raw units, the Vault checks the limit: it ensures that the amountOut is greater thanthe minimum amount the user was willing to accept (based on the slippage tolerance). If the limit check passes, the Vault moves to the final phase of the swap.
takeDebt/supplyCredit: These functions handle transient accounting for the transaction.
The Vault also deducts protocol and creator fees from the swap.
It then updates the _poolTokenBalances to reflect the tokenIn and tokenOut amounts.
A Swap event is emitted, which is useful for off-chain tracking and monitoring.
For this particular example, the Vault is essentially done here. However, for other hooks that include afterSwap functionality, this logic would be handled before the Vault returns the final amountIn and amountOut values (which are raw scaled).
Once the Vault has completed its duties, we return to the Router, where the final token transfers and accounting are handled in the swapSingleTokenHook function:
Final Token Transfers and Accounting
_takeTokenIn: This function handles the collection of input tokens from the user and the final settlement for transient accounting. It’s designed to work with both standard ERC20 tokens and the special case of ETH/WETH, making it versatile for different token types.
_sendTokenOut: This function manages the delivery of output tokens to the user and the final settlement for transient accounting. Like its counterpart, it supports both ERC20 tokens and ETH/WETH, ensuring consistent token handling regardless of the token type.
At this point, all credit and debt accumulated during the swap execution should be finalized. If transient accounting isn’t correctly settled, the swap would fail at this stage. Assuming everything checks out, the user has successfully swapped their tokens.
Conclusion
Through this walkthrough, we’ve followed the path of a swap in Balancer V3 and seen how the protocol handles the majority of the core logic under the hood. This leaves developers free to focus on the parts that matter most to them, like designing new hooks or customizing pool behavior.
Balancer’s modular architecture means you can build on a solid, audited foundation without needing to understand every detail from scratch — but having a clear picture of what’s happening under the surface can make things easier when you’re building something non-standard, troubleshooting edge cases, or just trying to understand how your code fits into the bigger system.
If you’re ready to start building check out the Balancer V3 developer docs for more detailed references and guides.
Using Balancer V3 peripheral contracts to simplify the development and testing of custom Hooks
In my previous post, I discussed the basics of Balancer Hooks and demonstrated how simple it is to create a custom hook with a decaying exit fee. The ease of development on Balancer V3 is greatly aided by the peripheral smart contracts crafted by the Ballerinas (the team behind Balancer’s smart contracts). These contracts serve as helpful tools, simplifying the testing workflow and enhancing the safety and efficiency of projects. In this article, we will explore these in greater detail, showing how they can make developers lives easier.
The Hook That Holds: Enabling Peg Stability through Fee-Based Solutions
In Balancer’s stable pools, maintaining a healthy peg is crucial for yield-bearing assets like stable coins and staking derivatives. However, as market dynamics take over, one token may become significantly overweight, leading to inefficiencies in trading. The mighty ZenDragon has proposed a possible hook design that defends the peg while allowing passive liquidity providers to benefit from this de-pegging behavior (details to be covered in an upcoming post). One possible implementation of this can be seen in this StableSurge hook example which also serves as a good showcase for the simplified development process.
Peripheral Power
The main hook contract inherits three useful building blocks and uses the custom FixedPoint maths library:
contract StableSurgeHookExample is BaseHooks, VaultGuard, Ownable {...
using FixedPoint for uint256;
BaseHooks
BaseHooks.sol is provided as an abstract contract, with a minimal implementation of a hooks contract. At a high level this contract includes:
Base implementation: A complete implementation of the IHooks.sol interface, with each implemented function returning false.
Configuration: A virtual function getHookFlags that must be implemented by your hooks contract, defining which hooks your contract supports.
By inheriting this contract a hooks developer can concentrate on implementing the subset of callbacks they are interested in and remain confident the rest of the interface requirement is covered. In the StableSurgeHookExample we override three functions:
getHookFlags
function getHookFlags() public pure override returns (HookFlags memory hookFlags){
  hookFlags.shouldCallComputeDynamicSwapFee = true;
}
This is the only mandatory hook and can effectively be thought of as defining the hook config. When a pool is registered, the Vault calls this function to store the configuration. In this example, the shouldCallComputeDynamicSwapFee flag is set to true, indicating that the contract is configured to calculate the dynamic swap fee.
onRegister
function onRegister(address factory, address pool, TokenConfig[] memory, LiquidityManagement calldata) public override onlyVault returns (bool) {
  return factory == _allowedFactory && IBasePoolFactory(factory).isPoolFromFactory(pool);
}
The onRegister function enables developers to implement custom validation logic to ensure the registration is valid. When a new pool is registered, a hook address can be provided to “link” the pool and the hook. At this stage, the onRegister function is invoked by the Vault, and it must return true for the registration to be successful. If the validation fails, the function should return false, preventing the registration from being completed.
In this example we validate that the factory param forwarded from the Vault matches the _allowedFactory set during the hook deployment, and that the pool was deployed by that factory.
onComputeDynamicSwapFeePercentage
The Vault calls onComputeDynamiceSwapFeePercentageto retrieve the swap fee value. This is where the big brain logic for the hook is implemented. The actual code is fairly long but the pseudo-code looks like:
Essentially the virtual weights of the tokens in the pool after the swap are calculated. If these are above a user defined threshold boundary a fee that is proportional to the weights distance from the threshold is returned. If not the normal static swap fee is used. The reader is encouraged to read the full code and theory to appreciate the implementation 🤓.
VaultGuard
The VaultGuard is a simple contract that shares the modifier onlyVault. This ensures a function can only be called when the sender is the vault.
modifier onlyVault() {
  _ensureOnlyVault();
  _;
}

function _ensureOnlyVault() private view {
  if (msg.sender != address(_vault)) {
  revert IVaultErrors.SenderIsNotVault(msg.sender);
  }
}
While it might seem overly cautious, especially for stateless hooks, it serves a crucial purpose. This restriction maintains predictable behavior and simplifies the reasoning about your contract’s state. It’s like having a bouncer at an exclusive club — sure, letting a few extra people in might not hurt, but it’s easier to manage when you stick to the guest list. This approach aligns with the standard lifecycle of Balancer pools, keeping the contract’s behavior consistent and secure. Of course, if the hook has state, permissioned functions, or any functions other than hook overrides, a more relaxed access policy can be appropriate.
Ownable
Ownable is actually an OpenZeppelin contract which “provides a basic access control mechanism, where there is an account (an owner) that can be granted exclusive access to specific functions.”
Here we are leveraging the onlyOwner to restrict the use of the setThresholdand setSurgeCoefficient functions to the owner of the contract. Ownership is set in the constructor to be the contract deployer:
FixedPoint is a very useful library that supports 18-decimal fixed point arithmetic. All Vault calculations use this for high and uniform precision. In this example we use it to calculate the swap fee. Some of the commonly used functions are:
powDown/Up which use the LogExpMath library Exponentiation and logarithm functions for 18 decimal fixed point numbers.
Testing
Testing in production is tempting but risky! The Balancer V3 mono-repo contains extensive tests and exposes a particularly useful BaseVaultTest contract that external teams are already leveraging during their own development. A few of the high level benefits include:
A default setup (that is also customizable) that handles all V3 related deployments including Vault, Router, Authorizer, etc and all associated approvals
Deployment of test tokens and initial seeding of balances for test accounts (test tokens take decimals as an argument, so you can construct them with different decimals if needed)
Easily handle deployment of your custom pools and hooks along with initial pool seeding and LP interactions (including all required approvals for common actions)
Helpers to get account balances (including pool balances), vault balances and hook balances
The detail of BaseVaultTest could probably be a post in itself so instead we will look at some specific examples of how I leveraged some of the functionality in my tests for the hook, StableSurgeExample.t.sol.
Test Pool And Hook Setup
As mentioned previously the StableSurge hook is configured to only work with a user configured pool factory. In this test, because the hook is expected to be used with Balancer StablePools, I want to make sure we use the StablePoolFactory. To achieve this we can override the createHook function which is called during the initial BaseVault setup:
function createHook() internal override returns (address) {
  stablePoolFactory = new StablePoolFactory(IVault(address(vault)), 365 days,    "Factory v1", "Pool v1");
  // LP will be the owner of the hook.
  vm.prank(lp);
  address stableSurgeHook = address(
  new StableSurgeHookExample(IVault(address(vault)), address(stablePoolFactory),   THRESHOLD, SURGE_COEFFICIENT)
);
  vm.label(stableSurgeHook, "Stable Surge Hook");
  return stableSurgeHook;
}
Fairly simple to follow, it deploys the StablePoolFactory and uses that address as part of the constructor input when deploying the StableSurgeHookExample. The address of the stableSurgeHook is returned at the end of the function and the BaseVaultTest exposes this via the poolsHookContract variable so it can be used later. Also interesting to note here is the hook is deployed by the lp account which will become the hook owner.
Next to override is the _createPool function which handles the actual pool deployment:
function _createPool(address[] memory tokens, string memory label) internal override returns (address) {
  PoolRoleAccounts memory roleAccounts;

  address newPool = address(
    stablePoolFactory.create(
    "Stable Pool Test",
    "STABLE-TEST",
    vault.buildTokenConfig(tokens.asIERC20()),
    AMP_FACTOR,
    roleAccounts,
    MIN_SWAP_FEE,
    poolHooksContract,
    false, // Does not allow donations
    false, // Do not disable unbalanced add/remove liquidity
    ZERO_BYTES32
  )
  );
  vm.label(newPool, label);  authorizer.grantRole(vault.getActionId(IVaultAdmin.setStaticSwapFeePercentage.selector), admin);
  vm.prank(admin);
  vault.setStaticSwapFeePercentage(newPool, SWAP_FEE_PERCENTAGE);

  return newPool;
}
The StableSurge hook is expected to be used with Balancer Stable Pools so unlike some other hook tests I need to make sure I’m not testing with the default MockPool. I use the stablePoolFactory to create a new pool that is configured to use our previously deployed hook, poolHooksContract. The last part of this process is to use the authorizer to set the pool static swap fee. This will be the expected fee when the pool is not “surging”.
And thats it! Now whenever we run our test (using: $ forge test --match-path test/foundary/StableSurgeExample.t.sol) the setUp function will be called and everything is deployed, seeded and ready for tests.
Testing Balances
The final helper we’ll check out is getBalances which can be found here. This function extracts and returns a collection of essential balances, encompassing test user pool and token balances, hook balances, and vault balances. It’s an invaluable tool for validating correct balance adjustments following operations, streamlining the testing process considerably:
function testSwapBelowThreshold() public {
  BaseVaultTest.Balances memory balancesBefore = getBalances(lp);

  // Calculate the expected amount out (amount out without fees)
  uint256 poolInvariant = StableMath.computeInvariant(
    AMP_FACTOR * StableMath.AMP_PRECISION,
    balancesBefore.poolTokens
  );
  uint256 expectedAmountOut = StableMath.computeOutGivenExactIn(
  AMP_FACTOR * StableMath.AMP_PRECISION,
  balancesBefore.poolTokens,
  daiIdx,
  usdcIdx,
  amountInBelowThreshold,
  poolInvariant
  );

  // Swap with amount that should keep within threshold
  vm.prank(bob);
  router.swapSingleTokenExactIn(pool, dai, usdc, amountInBelowThreshold, 0,   MAX_UINT256, false, bytes(""));

  BaseVaultTest.Balances memory balancesAfter = getBalances(lp);

  // Check Bob's balances (Bob deposited DAI to receive USDC)
  assertEq(
  balancesBefore.bobTokens[daiIdx] - balancesAfter.bobTokens[daiIdx],
  amountInBelowThreshold,
  "Bob DAI balance is wrong"
);

...
There is also an alternative implementation that allows balances to be tracked across user defined tokens/pools.
Conclusion
Hopefully this has given a helpful intro to some of the options available to improve the experience and efficiency while developing on top of Balancer V3. It really is easy and quick to get going so take some time and hack around and please reach out anytime if you have any questions or suggestions!
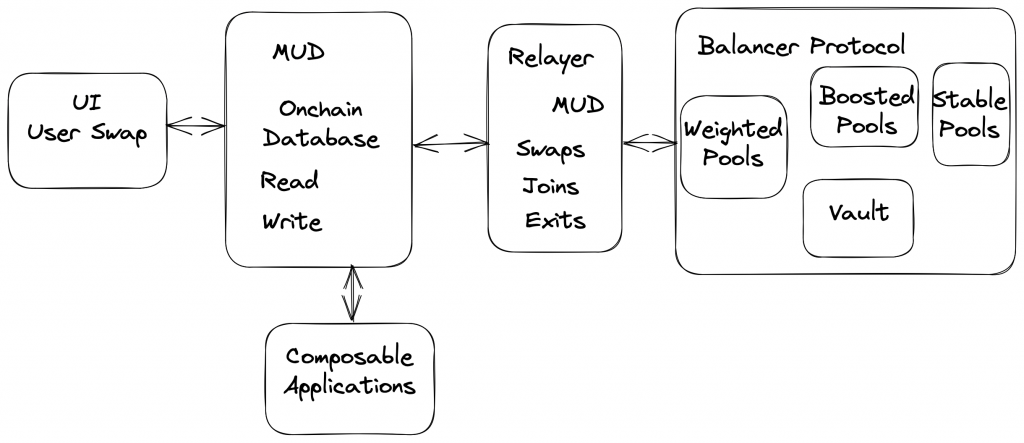
Unfortunately I have no game development skills so the idea was to see how MUD could be used with an existing DeFi protocol. In this case by creating a new Balancer Relayer that was integrated with MUD and a front end to show swap data.
From the MUD docs: “MUD is a framework for ambitious Ethereum applications. It compresses the complexity of building EVM apps with a tightly integrated software stack.” The stand out for me is:
No indexers or subgraphs needed, and your frontend is magically synchronized!
Since my early days at Balancer the Subgraph has been one of the main pain points I’ve come across. I’ve always thought there’s a clear need/opportunity for a better way of doing things. When I first saw the DevCon videos showing how the MUD framework worked it reminded me of the early days of the Meteor framework which was seemed like magical frontend/backend sync technology when I first saw it. With MUD we also get the whole decentralised/composability aspect too. It really seems like this could be a challenger and the hackathons a perfect way to get some experience hacking on it!
Solution Overview
Balancer Relayers are contracts that allow users to make calls to the Balancer Vault on behalf of the users. They can use the sender’s ERC20 vault allowance, internal balance, and BPTs on their behalf. As I’ve written before, multiple actions such as exit/join pools, swaps, etc can be chained together, improving the UX.
It’s important to note that because the Relayers have permissions over user funds they have to be authorized by the protocol. This authorisation is handled by Balancer Gorvernance and you can see a past governance proposal and authorisation PR here and here.
The MUD Store is the onchain database that can be written and read from similar to a normal database. The MUD framework handles all the complexity and makes developing with the Store super smooth.
By developing a new MUD enabled Relayer we can use a well established, battle tested Balancer protocol (Balancer 80/20 pools in particular could be interesting as liquidity for gaming assets) combined with all the benefits the MUD framework offers.
The How
Mainnet Forking
By using a local node forked from mainnet we can use all the deployed Balancer info including the real pools, assets and governance setup. To build this into the dev setup based off the MUD template project I added a .env with a mainnet archive from Alchemy and edited the root package.json` node script like so:
Now when the pnpm dev command is run it spins up a forked version of mainnet (with a chainId of 31337 which makes everything else keep working) and all the associated MUD contracts used during the normal dev process will be deployed there for use.
Relayer With MUD
The most recent Balancer Relayer V5 code can be found here. In the Hackathon spirit I decided to develop a very simple (and unsafe) version (I initially tried replicating the Relayer/Library/Multicall approach used by Balancer but had issues with proxy permissions on the store that I didn’t have time to solve). It allows a user to execute a singleSwap. The complete code is shown below:
import { System } from "@latticexyz/world/src/System.sol";
import { Swap } from "../codegen/Tables.sol";
import { IVault } from "@balancer-labs/v2-interfaces/contracts/vault/IVault.sol";
import "@balancer-labs/v2-interfaces/contracts/standalone-utils/IBalancerRelayer.sol";

contract RelayerSystem is System {
  IVault private immutable _vault;

  constructor() {
    _vault = IVault(address(0xBA12222222228d8Ba445958a75a0704d566BF2C8));
  }

  function getVault() public view returns (IVault) {
    return _vault;
  }

  function swap(
        IVault.SingleSwap memory singleSwap,
        IVault.FundManagement calldata funds,
        uint256 limit,
        uint256 deadline,
        uint256 value
    ) external payable returns (uint256) {
        require(funds.sender == msg.sender || funds.sender == address(this), "Incorrect sender");
        uint256 result = getVault().swap{ value: value }(singleSwap, funds, limit, deadline);
        bytes32 key = bytes32(abi.encodePacked(block.number, msg.sender, gasleft()));
        Swap.set(key, address(singleSwap.assetIn), address(singleSwap.assetOut), singleSwap.amount, result);
        return result;
  }
}
I think the simplicity of the code snippet really demonstrates the ease of development using MUD. By simply inheriting from the MUD System I can read and write to the MUD Store. In this case I want to write the assetIn, assetOut, amount and result for the trade being executed into the Swap table in the store where it can be consumed by whoever (see the Front End section below to see how). I do this in:
The rest (including deployment, etc) is all taken care of by the framework 👏
Permissions
Before I can execute swaps, etc there is some housekeeping to take care of. Any Balancer Relayer must be granted permission via Governance before it can be used with the Vault. In practice this means that the AuthorisergrantRoles(roles, relayer) `function must be called from a Governance address. By checking out previous governance actions we can see the DAO Multisig has previously been used to grant roles to relayers. Using hardhat_impersonateAccount on our fork we can send the transaction as if it was from the DAO and grant the required roles to our Relayer. In our case the World calls the Relayer by proxy so we grant the role to the world address (not safe in the real world :P).
async function grantRelayerRoles(account: string) {
    const rpcUrl = `http://127.0.0.1:8545`;
    const provider = new JsonRpcProvider(rpcUrl);
    // These are the join/exit/swap roles for Vault
    const roles = ["0x1282ab709b2b70070f829c46bc36f76b32ad4989fecb2fcb09a1b3ce00bbfc30", "0xc149e88b59429ded7f601ab52ecd62331cac006ae07c16543439ed138dcb8d34", "0x78ad1b68d148c070372f8643c4648efbb63c6a8a338f3c24714868e791367653", "0xeba777d811cd36c06d540d7ff2ed18ed042fd67bbf7c9afcf88c818c7ee6b498", "0x0014a06d322ff07fcc02b12f93eb77bb76e28cdee4fc0670b9dec98d24bbfec8", "0x7b8a1d293670124924a0f532213753b89db10bde737249d4540e9a03657d1aff"];
    // We impersonate the Balancer Governance Safe address as it is authorised to grant roles
    await provider.send('hardhat_impersonateAccount', [governanceSafeAddr]);
    const signer = provider.getSigner(governanceSafeAddr);

    const authoriser = new Contract(authoriserAddr, authoriserAbi, signer);

    const canPerformBefore = await authoriser.callStatic.canPerform(roles[0], account, balancerVaultAddr);

    // Grants the set roles for the account to perform on behalf of users
    const tx = await authoriser.grantRoles(roles, account);
    await tx.wait();
    const canPerformAfter = await authoriser.callStatic.canPerform(roles[0], account, balancerVaultAddr);
    console.log(canPerformBefore, canPerformAfter);
}
The World address is updated each time a change is made to contracts, etc so its useful to use a helper:
import worldsJson from "../../contracts/worlds.json";

export function getWorldAddress(): string {
    const worlds = worldsJson as Partial<Record<string, { address: string; blockNumber?: number }>>;
    const world = worlds['31337'];
    if(!world) throw Error('No World Address');
    return world.address;
}
The Relayer must also be approved by the user who is executing the swap. In this case I select a user account that I know already has some funds and approvals for Balancer Vault. That account must call setRelayerApproval(account, relayer, true) on the Balancer Vault.
In packages/helpers/src/balancerAuth.ts there’s a helper script that can be run using pnpm auth which handles all this and it should be run each time a new World is deployed.
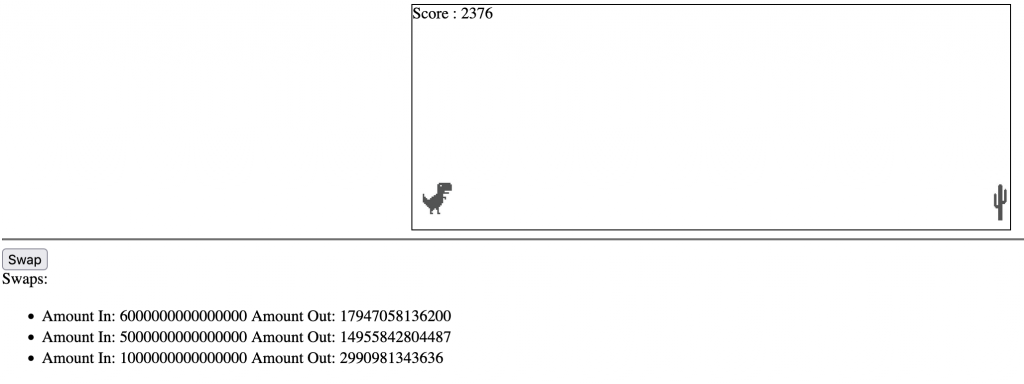
Front End
Disclaimer – my front-end UI is ugly and some of the code is hacky, but it works! The idea here was to just show a super simple UI that updates anytime a swap is made through our relayer.
To trigger a swap via the UI I’ve got a simple button wired up to a systemCall:
I took the approach of impersonating the test account that we previously setup the Relayer permission for to avoid the UX of approving, etc via the UI. We just submit the swap data via the worldContract which proxies the call to the Relayer.
To display the swap data from the Store I use the storeCache which is typed and reactive. A simplified snippet shows how:
(One other hack I had to make to get it working. In packages/client/src/mud/getNetworkConfig.ts I had to update the initialBlockNumber to 17295542.)
To demonstrate the reactive nature I also added another helper script that can be used to execute a swap with a random amount (see: packages/helpers/src/worldSwap.ts). This can be run using pnpm swap and its awesome to see the UI update automatically. I also really like the MUD Dev Tools which shows the Store updating.
Composability
I think one of the most exciting and original aspects of Autonomous Worlds is the opportunities for composability. With the standardisation of data formats in the MUD Store experimentation is made easier. As an extremely basic implementation of this I thought it was cool to show how the swap data could be used in another non-defi related app like a game. In this case I implemented the famous Google Dino hopper game where a cactus is encountered whenever a swap is made. We can import the swap data as before and trigger a cactus whenever a new swap record is added. (See packages/client/src/dino for the implementation).
Although basic, hacky and ugly it demonstrates how an Autonomous World of composable games, defi and data can start to develop. The really cool thing is who knows how it takes shape! MUD is a super cool tool and I’m excited to see it develop.
A relayer is a contract that is authorized by the protocol and users to make calls to the Vault on behalf of the users. It can use the sender’s ERC20 vault allowance, internal balance and BPTs on their behalf. Multiple actions (such as exit/join pools, swaps, etc) can be chained together which improves the UX.
For security reasons a Relayer has to be authorised by the Balancer DAO before it can be used (see previous votes for V1 and V2) and even after authorisation each user would still be required to opt into the relayer by submitting an approval transaction or signing a message.
Having the multicall single point of entry prevents reentrancy. The library contract cannot be called directly but the multicall can repeatedly delegatecall into the library code to perform a chain of actions.
Some psuedo code demonstrating how an authorisation, exitPool and swap can be chained and called via the multicall function:
A Relayer can also be approved by using the setRelayerApproval function from the BaseRelayerLibrary contract. Here a signed authorisation message from the user is passed as an input parameter. This allows an approval to be included at the start of a chain of actions so the user only needs to submit a single transaction creating a better UX.
Chained References
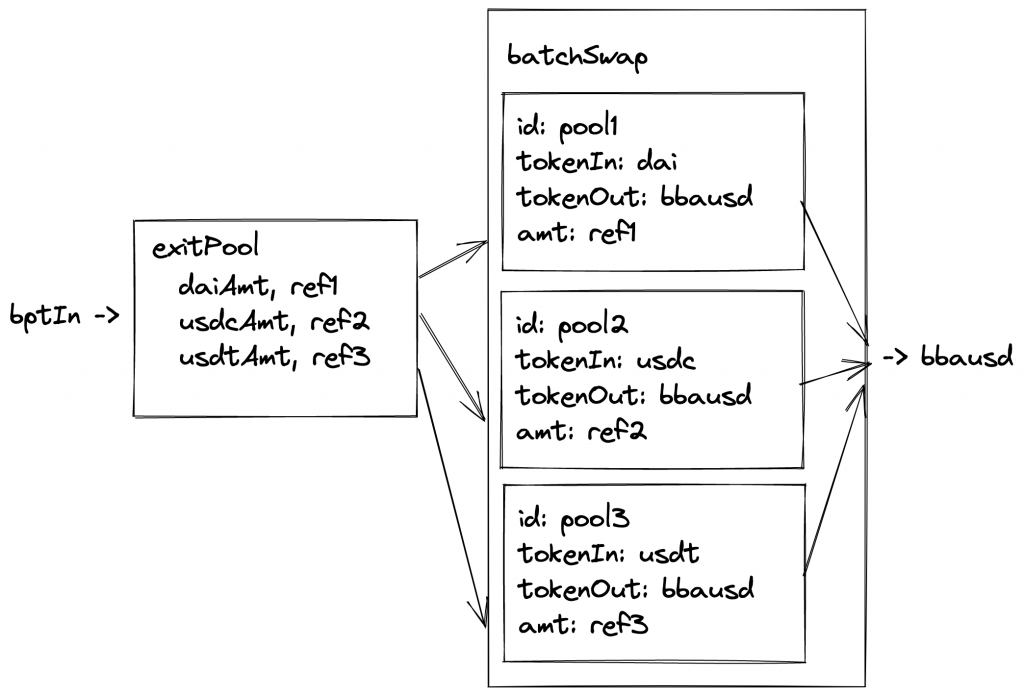
Output References allow the Relayer to store output values from once action which can then be read and used in another action. This allows us to chain together actions. For example we could exit a pool, save the exit amounts of each token to a reference and then do a batchSwap using the references as input amounts for each swap:
Where the key is the slot the value will be stored at. Index indicates which output amount should be stored. For example if exitPool exits to 3 tokens, DAI (index 0), USDC (1), USDT (2), we would want to use index 0 to store DAI, 1 for USDC, etc.
Example Use Case – Pool Migration
Intro
Balancer aims for the best capital efficiency for LPs so it made sense to offer the option to migrate from the old “staBal3” pool consisting of DAI, USDC and USDT to a new “boosted” stable pool which is more capital efficient because it uses yield bearing assets.
To migrate between these pools would take multiple steps:
unstake from staBal3 gauge → staBalBpt
exitPool from staBal, staBalBpt → DAI, USDC, USDT
join the bb-a-usd2 pool by using batchSwaps
DAI → bbausd2Bpt
USDC → bbausd2Bpt
USDT → bbausd2Bpt
stake bbausd2Bpt in gauge
This would be quite an ordeal for a user to do manually but the Relayer can be used to combine all these actions into a single transaction for the user.
Details
As this is a well defined one off action we decided to add this function to the SDK as a “Zap” under a Migrations module. The user can call the staBal3 function to get all the call data required to call the tx:
{ to, data } = migrations.stabal3(
  userAddress,
  staBal3Amount,
  minBbausd2Out,
  isStaked,
  authorisationSignature
);
Behind the scenes all the call data for each step is crafted and the encoded multicall data is returned:
buildSetRelayerApproval allows the user to pass the approval signature if this is their first time using the relayer. This allows us to approve and execute the migration all in a single transaction.
buildWithdraw and buildDeposit handle the gauge actions. The initial call is to withdraw from the staBal gauge and the final call deposits the bbausd2 bpt into the new gauge. We withdraw directly to the Relayer address rather than the users. The gauges return the tokens to the caller, so sending them to the user costs more as we need to manually transfer them:
gauge.withdraw(amount);
// Gauge does not support withdrawing BPT to another address atomically.
// If intended recipient is not the relayer then forward the withdrawn BPT on to the recipient.
if (recipient != address(this)) {
    IERC20 bptToken = gauge.lp_token();
    bptToken.transfer(recipient, amount);
}
Skipping this has two benefits. Firstly it saves gas by avoiding an extra transfer. It also avoids approval issues as now the Relayer is just using its own funds. The final deposit uses the userAddress to send the staked tokens from the Relayer back to the user.
buildExit creates the exitPool call:
// Ask to store exit outputs for batchSwap of exit is used as input to swaps
    const outputReferences = [
      { index: assetOrder.indexOf('DAI'), key: EXIT_DAI },
      { index: assetOrder.indexOf('USDC'), key: EXIT_USDC },
      { index: assetOrder.indexOf('USDT'), key: EXIT_USDT },
    ];

    const callData = Relayer.constructExitCall({
      assets,
      minAmountsOut: ['0', '0', '0'],
      userData,
      toInternalBalance: true,
      poolId: this.addresses.staBal3.id,
      poolKind: 0, // This will always be 0 to match supported Relayer types
      sender,
      recipient: this.addresses.relayer,
      outputReferences,
      exitPoolRequest: {} as ExitPoolRequest,
    });
Output references are used to store the final amounts of each stable token received from the pool. We have precomputed the keys by using the Relayer.toChainedReference helper, like:
Also of interest is the fact we set toInternalBalance to true. The Balancer V2 vault can accrue ERC20 token balances and keep track of them internally in order to allow extremely gas-efficient transfers and swaps. Exiting to internal balances before the swaps allows us to keep gas costs down.
Because we have previously exited into internal balances we also don’t have to worry about the users having previously approved the Relayer for the tokens:
if (fromInternalBalance) {
// We take as many tokens from Internal Balance as possible: any remaining amounts will be transferred.
uint256 deductedBalance = _decreaseInternalBalance(sender, token, amount, true);
// Because deductedBalance will be always the lesser of the current internal balance
// and the amount to decrease, it is safe to perform unchecked arithmetic.
amount -= deductedBalance;
}

if (amount > 0) {
token.safeTransferFrom(sender, address(this), amount);
}
so the amount will be 0 and the safeTransferFrom call will not be executed.
buildSwap – We can join bbausd2 using a swap thanks to the PhantomBpt concept so here we create a batchSwap call that swaps each stable token to the bbausdBpt and we use the output references from the exitPool call as the input amounts to the swap (which is great as we don’t need to precompute these).
This is used as an input to the final gauge deposit to make sure we stake all the BPT that we have received and that should conclude the migration! You can see this in action on a local fork (yay no real funds required!) by running the integration test here.
Conclusion
The Balancer Relayer is probably not that well known so hopefully this has given a good overview of some of its functionality and flexibility. There’s a lot of room for experimentation and improvement of UX for complex operations so its worth investigating!
Uniswap is a simple smart contract interface for swapping ERC20 tokens and in general it’s pretty awesome. The story behind it is really inspirational to me and just recently Hayden Adams tweeted that $10million of liquidity was added in a 24 hour period – surely pretty succesful by any measure!
Some of the features of Uniswap include:
Supplies on-chain liquidity to other smart contracts
Ease of use
Gas efficiency (10x less than Bancor)
Decentralised/censorship resistant
And just as a reminder:
Liquidity describes the degree to which an asset or security can be quickly bought or sold in the market at a price reflecting its intrinsic value.
Each Uniswap pool holds Eth and another token and trades are exectuted against these reserves.
By supplying tokens to the pooled reserve (being a liquidity provider) you get a proportional share of transaction fees via a liquidity token.
Prices are set automatically using eqn: x * y = k or in terms of tokens: eth_pool * token_pool = invariant.
The invariant is constant during trades but DOES change when liquidity is added or removed from pool. (So not really an invariant?!)
Liquidity Tokens
Liquidity tokens are minted to track the relative proportion of total reserves that each liquidity provider has supplied.
Fees are taken during a token swap and are added to the liquidity reserves. Since total reserves are increased without adding any additional share tokens, this increases that value of all liquidity tokens equally. This functions as a payout to liquidity providers that can be collected by burning shares. (It’s also the reason that the invariant increases at the end of every trade)
When a liquidity provider joins the pool the amount of liquidity tokens minted are calcualted by:
(Initial pool liquidity is equal to initial Eth value provided)
total_liquidity = self.totalSupply
eth_reserve = self.balance - msg.value
liquidity_minted = msg.value * total_liquidity / eth_reserve
Liqudity tokens can be burned at any time to return a proportional share of the markets liquidity to the provider:
Eth -> Token: Traders Eth is added to pool and Token is removed. So Eth amount increases, token amount decreases. Token becomes more expensive.
Token -> Eth: Traders Token is added to pool and Eth is removed. So Eth amount decreases, token amound decreases. Eth becomes more expensive.
Arbitrage
Arbitrage seems to be the key to so many DeFi applications! I think the following is nice description of what it is:
Arbitrage trading is a strategy that can be best understood as a trader that takes advantage of the price differential that exists between two markets. In the case of cryptocurrency, this price differential can be found in the differences in price of a digital asset between cryptocurrency exchanges. If a trader identified an opportunity for arbitrage trading, then they would purchase a digital asset in one exchange, and then sell it on another cryptocurrency exchange.
To me it’s all about icentives – basically in the form of greed! There’s always someone looking to make money from an opportunity. In this case they execute a trade to make a profit but by making they trade they change the price which basically corrects it to the market price – that’s cool!
For example:
the global price of ETH-USD moves enough away from the pool price, an arbitrage opportunity exists and is corrected
When the initial liquidity is provided the exchange rate is set. If the ratio of liquidity provided isn’t realistic arbitrage traders will correct at the expense of initial liquidity provider.
Some Examples With Numbers
Invariant is set on initial deposit to a new pool. For example 10 ETH and 500 FUN are deposited into new ETH/FUN pool. Invariant is set to:
ETH_pool * FUN_pool = invariant
10 * 500 = 5000
Now for an ETH -> FUN trade:
Buyer sends 1ETH

Fee = 1 ETH / 400 = 0.0025 ETH (0.25% fee)

ETH_pool = 10 + 1 - 0.0025 = 10.9975

FUN_pool = 5000/10.9975 = 454.65 (invariant/ETH_pool)

Buyer receives: 500 - 454.65 = 45.35 FUN

Fee is added back to pool:

ETH_pool = 10.9975 + 0.0025 = 11

FUN_pool = 454.65

New invariant = 11 * 454.65 = 5001.15

Executed price = 45.35 FUN/ETH

But now price has changed:

Fee = 0.0025 ETH
ETH_pool = 11.9975
FUN_pool = 5001.15/11.9975 = 416.85
Buyer receives: 454.65 - 416.85 = 37.8

Executed price = 37.8 FUN/ETH
Price Slippage
Price slippage refers to the difference between the expected price before a transaction is executed and the actual price at which it is executed.
Easiest for me to think of spot price and actual price.
A trade that is large relative to the size of the total size of the liquidity pool will cause price slippage.
Same example as above:
ETH_pool * FUN_pool = invariant
10 * 500 = 5000

Spot price for ETH -> FUN = 500/10 = 50

1ETH Purchase: Executed price = 45.35 FUN/ETH

10ETH Purchase: Executed price = 24.969 FUN/ETH

Fee = 10 ETH / 400 = 0.025 ETH (0.25% fee)

ETH_pool = 10 + 10 - 0.025 = 19.975

FUN_pool = 5000/19.975 = 250.31

Buyer receives: 500 - 250.31 = 249.69 FUN

Fee is added back to pool:

ETH_pool = 19.975 + 0.025 = 20

FUN_pool = 250.31

New invariant = 20 * 250.31 = 5006.2

Executed price = 24.969 FUN/ETH
Final Thought
I found this comment from Vitalik on this EthResearch post interesting:
The point is not for this kind of exchange to be the only exchange; the point is for it to be one type among many. It offers the benefits of executing a complete trade in one transaction, and extreme user-friendliness even to smart contracts, which are very real benefits and will at least sometimes exceed the costs of slippage to some users. I am ok with just accepting that this kind of approach will not be acceptable to whales who want to liquidate large amounts of things; that’s not the target market.
I was using Dharma.io to earn interest on my SAI (formerly DAI). I found Dharma really nice to use and originally offered a good interest rate. Recently the rate had become less competitive and I was getting concerned (maybe unneccesarily?) about the lack of comms about migrating the SAI to DAI so I decided to take matters into my own hands especially now that the DAI Savings Rate has kicked in.
When I swapped I was getting 3.22% for SAI on Dharma.io. The DAI savings rate is 4% and looks like it might get raised to 6% soon so definitely worth the swap.