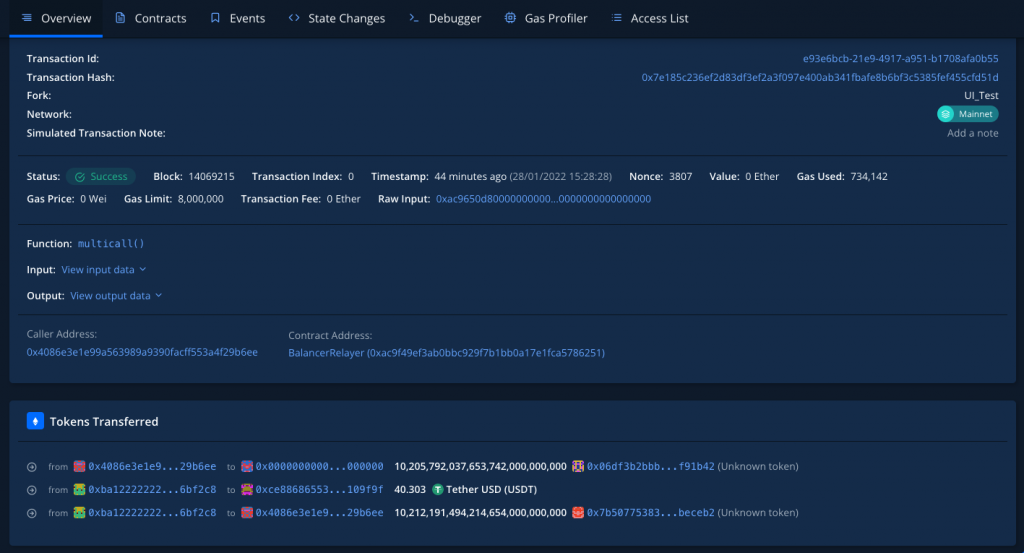
I want to check that a transaction will work on mainnet for an account I don’t control. In this case it’s for a large LP in the Balancer staBal3 pool and I want to check they could successfully migrates their staBal3 to the new bb-a-USD using a Relayer multicall with the params created by the SDK.
This definitely isn’t the most elegant way of doing things but it works!
Whale Hunting
The first thing I need to do is to find a large staBal3 LP account and figure out their BPT balance. I can use the Balancer Subgraph to query account pool shares for the staBal3 pool. Query looks like:
The SDK helper function (relayer.exitPoolAndBatchSwap) that creates the call data requires an input param of expectedAmountsOut which in this case represents the DAI/USDC/USDT amounts out when exiting the staBal3 pool. Because I don’t have the maths required for this exposed yet a quick way to get this is to see the output amounts using Withdraw in the UI. There’s a very nice tool that allows us to simulate this when we don’t have control of the account of interest: https://www.impersonator.xyz/
Now that I’ve got all the info required I can generate the call data by using the helper function. In this case we get an array of call data which represent an exitPool call on staBal3 followed by a batchSwap that swaps the stables received from the exit to the bb-a-USD BPT.
The Magic
Tenderly has lots of useful features including Transaction Simulations. To begin I tried simulating the multicall call on the Mainnet Relayer but the tx failed highlighting a new issue – the account hasn’t approved the Balancer Relayer. To get around this I can use a Tenderly Fork – “Forks allow you to chain simulation and test out complex scenarios with live on-chain data”. This is cool because I can now fork the chain make an approval on the relayer from the account which then allows me to succesfully simulate the multicall!
A big focus for Balancer Labs this year is to make it really easy to build on top of the protocol. To aid in that we’re putting together the `@balancer-labs/sdk npm package. As the current lead in this project I thought I’d try and document some of the work to help keep track of the changes, thought process and learning along the way. It’ll also be useful as a reminder of what’s going on!
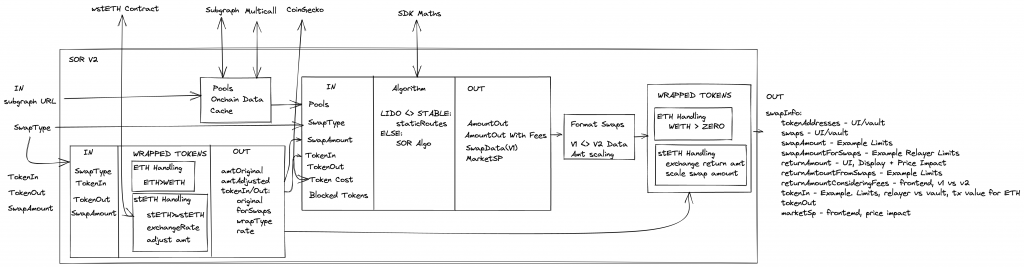
SOR v2
Some background
We already have the Smart Order Router (@balancer-labs/sor), a package that devs can use to source the optimal routing for a swap using Balancer liquidity. It’s used in Balancers front-end and other projects like Copper and is a solver for Gnosis BGP. It’s also used in the Beethoven front-end (a Balancer friendly fork on Fantom, cool project and team and worth checking out).
The SOR is also used and exposed by the SDK. It’s core to making swaps accesible but is also used for joining/exiting Boosted Pools which uses PhantomBpt and swaps (a topic for another time I think!).
SOR Data
The diagram below shows some of the core parts of the SOR v2.
SOR v2
To choose the optimal routes for a swap the SOR needs information about the Balancer pools and the price of assets. And as we can see from the diagram the sourcing of this data is currently very tightly coupled to the SOR. Pools data is retrieved from the Subgraph and updated with on-chain balances using a multicall. And asset pricing is retrieved from CoinGecko.
Recently Beethoven experienced a pretty large growth spurt and found there were some major issues retrieving data from the Subgraph. They also correctly pointed out that CoinGecko doesn’t always have the asset pricing (especially on Fantom) and this information could be available from other sources.
After some discussions with Daniel (a very helpful dev from Beethoven) it was agreed that a good approach would be to refactor the SOR to create composability of data fetching so the user is able to have more control over where data is coming from. With this approach, the SOR doesn’t need to know anything about CoinGecko or the Subgraph and the data could now come from anywhere (database, cache, on chain, etc.), and as long as it implements the interface, the SOR will work properly.
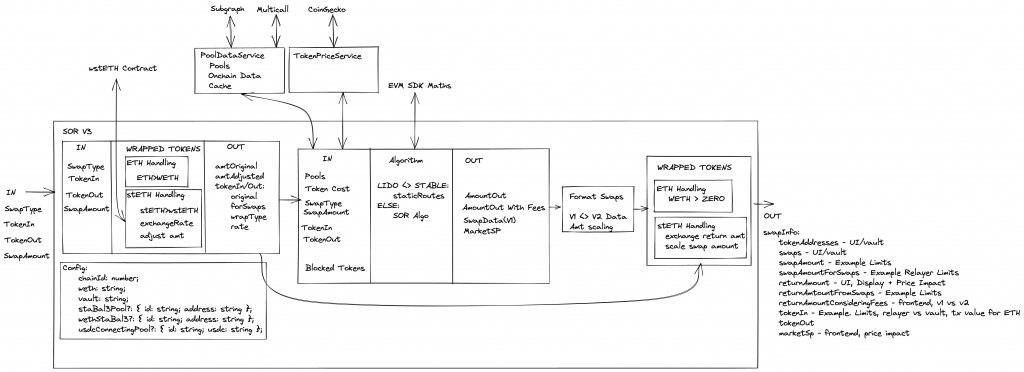
Changes – SOR v3
I came back from Christmas break and Daniel had made all the changes – friendly forks for the win 💪! The interface changes are breaking but the improvements are worth it – SOR 3.0.0.
Config
The goal was to remove all the chain specific config from the SOR and pass it in as a constructor parameter. This helps to avoid non-scalable hard-coded values and encorages a single source of truth. It also gives more flexibility for the variables and makes the code easier to test.
The goal here is to allow for flexibility in defining where the pool data is fetched from. We define a generic PoolDataService that has a single function getPools, which serves as a generic interface for fetching pool data. This allows allow for any number of custom services to be used without having to change anything in the SOR or SDK.
Approaching it this way means all the Subgraph and on-chain/multicall fetching logic is removed from the SOR. These will be added to the Balancer SDK as stand-alone services. But as a simple example this is a PoolDataService that retrieves data from Subgraph:
The goal here is to allow for flexibility in defining where token prices are fetched from. We define a generic TokenPriceService that has a single function getNativeAssetPriceInToken. Similar to the PoolDataService this offers flexibility in the service that can be used, i.e. CoingeckoTokenPriceService or SubgraphTokenPriceService.
export interface TokenPriceService {
    /**
     * This should return the price of the native asset (ETH) in the token defined by tokenAddress.
     * Example: BAL = $20 USD, ETH = $4,000 USD, then 1 ETH = 200 BAL. This function would return 200.
     * @param tokenAddress
     */
    getNativeAssetPriceInToken(tokenAddress: string): Promise<string>;
}
All the CoinGecko code is removed from the SOR (to be added to SDK). An example TokenPriceService using CoinGecko:
export class CoingeckoTokenPriceService implements TokenPriceService {
    constructor(private readonly chainId: number) {}

    public async getNativeAssetPriceInToken(
        tokenAddress: string
    ): Promise<string> {
        const ethPerToken = await this.getTokenPriceInNativeAsset(tokenAddress);

        // We get the price of token in terms of ETH
        // We want the price of 1 ETH in terms of the token base units
        return `${1 / parseFloat(ethPerToken)}`;
    }

    /**
     * @dev Assumes that the native asset has 18 decimals
     * @param tokenAddress - the address of the token contract
     * @returns the price of 1 ETH in terms of the token base units
     */
    async getTokenPriceInNativeAsset(tokenAddress: string): Promise<string> {
        const endpoint = `https://api.coingecko.com/api/v3/simple/token_price/${this.platformId}?contract_addresses=${tokenAddress}&vs_currencies=${this.nativeAssetId}`;

        const response = await fetch(endpoint, {
            headers: {
                Accept: 'application/json',
                'Content-Type': 'application/json',
            },
        });

        const data = await response.json();

        if (
            data[tokenAddress.toLowerCase()][this.nativeAssetId] === undefined
        ) {
            throw Error('No price returned from Coingecko');
        }

        return data[tokenAddress.toLowerCase()][this.nativeAssetId];
    }

    private get platformId(): string {
        switch (this.chainId) {
            case 1:
                return 'ethereum';
            case 42:
                return 'ethereum';
            case 137:
                return 'polygon-pos';
            case 42161:
                return 'arbitrum-one';
        }

        return '2';
    }

    private get nativeAssetId(): string {
        switch (this.chainId) {
            case 1:
                return 'eth';
            case 42:
                return 'eth';
            case 137:
                return '';
            case 42161:
                return 'eth';
        }

        return '';
    }
}
Final Outcome
After the changes the updated diagram shows how the SOR is more focused and less opinionated:
The plan for the Balancer front-end is to move away from using the SOR directly and use it via the SDK package. The SDK will have the data fetching functionality as serparate services (which can be used independetly for fetching pools, etc) and these will be passed to the SOR when the SDK is instantiated. BUT it’s also possible to use the SOR independendtly as shown in this swapExample.
This was a large and breaking change but with the continued issues with Subgraph and more teams using the SOR/SDK it was a neccessary upgrade. Many thanks to Daniel from the Beethoven team for pushing this through!
Etherscan is a really useful website but fairly recently I discovered they also have a pretty handy Developer API. I used it to analyse gas a contract was using over a period of time and thought it might be useful to record.
Getting Started
First of all an API key is required and this can be created for free by logging in and going to: https://etherscan.io/myapikey.
I’m going to paste my code with comments which should be easy enough to follow. The API covers a whole lot of other end point such as Logs, Tokens, etc that I didn’t use but the docs are good and worth a scan.
Lately at Balancer we’ve moved from the Truffle development environment to using Buidler, Waffle and Ethers. The main benefit is being able to use console.log in Solidity during debugging – it’s amazing how much of a difference this makes and for this alone the change over is worth it. Here’s some notes I made during the switch over.
Ethers
The ethers.js library aims to be a complete and compact library for interacting with the Ethereum Blockchain and its ecosystem.
The following gist demonstrates some basic usage of Ethers that creates an instance of a deployed contract and then running some calls against it:
Buidler & Waffle
Buidler is described as a ‘task runner’. I think its easiest to see it as a swap for Truffle/Ganache. It has lots of different plugins that make it really useful and its documentation was refreshingly good.
The Quickstart shows you how to install and how to run common tasks. It also uses Waffle for testing. Waffle is a simple smart contract testing library built on top of Ethers.js. Tests in Waffle are written using Mocha alongside with Chai and from my experience everything just worked. The docs are here. And its worth digging in to see some of the useful things it offers such as Chai Matchers which allow you to test things like reverts, events, etc.
Buidler commands I found I used a lot:
Run the local Buidler EVM: $ npx buidler node
Compile project contracts: $ npx buidler compile
Run tests: $ npx buidler test ./test/testfile.ts
Here’s an example test file I used that demonstrates a few useful things:
Static Calls
let poolAddr = await factory.callStatic.newBPool(); – The contract callStatic pretends that a call is not state-changing and returns the result. This does not actually change any state and is free.
Connecting Different Accounts
await _pools[1].connect(newUserSigner).approve(PROXY, MAX); – Using contract connect(signer) calls the contract via the signer specified.
Setting the gasPrice to 0 like above allows me to run the transaction without spending any Eth on it. This was useful when checking Eth balance changes without having to worry about gas costs.
I needed the test accounts to have more than the 1000Eth balance set by default. In buidler.config.ts you can add accounts with custom balances like above.
Deploying
Deploying is done using scripts. First I updated my buidler.config.ts with the account/key for Kovan that will be used to deploy (i.e. must have Eth):
async function main() {
  // We get the contract to deploy
  const ExchangeProxy = await ethers.getContractFactory("ExchangeProxy");
  const WETH = '0xd0A1E359811322d97991E03f863a0C30C2cF029C';
  const exchangeProxy = await ExchangeProxy.deploy(WETH);

  await exchangeProxy.deployed();

  console.log("Proxy deployed to:", exchangeProxy.address);
}

main()
  .then(() => process.exit(0))
  .catch(error => {
    console.error(error);
    process.exit(1);
  });
Then run this using: npx buidler run --network kovan deploy-script.js
🎉 Console Logging 🎉
One of the holy grails of Solidity development and so easy to setup in this case! There are also Solidity stack traces and error messages but unfortunately there was a bug that caused this not to work for our contracts.
To get this going all you need to do is add: import "@nomiclabs/buidler/console.sol"; at the top of your contract then use console.log. More details on what kind of outputs, etc it supports are here. Lifesaver!
Hope some of this was helpful and you enjoy using it as much as me.
And make sure test is in root/test/example.spec.ts
import { expect, assert } from 'chai';
import 'mocha';
import { Pool } from '../src/types';
import { smartOrderRouter } from '../src/sor';
import { BigNumber } from '../src/utils/bignumber';
import { getSpotPrice, BONE } from '../src/helpers';

const errorDelta = 10 ** -8;

function calcRelativeDiff(expected: BigNumber, actual: BigNumber): BigNumber {
    return expected
        .minus(actual)
        .div(expected)
        .abs();
}

// These example pools are taken from python-SOR SOR_method_comparison.py
let balancers: Pool[] = [
    {
        id: '0x165021F95EFB42643E9c3d8677c3430795a29806',
        balanceIn: new BigNumber(1.341648768830377422).times(BONE),
        balanceOut: new BigNumber(84.610322835523687996).times(BONE),
        weightIn: new BigNumber(0.6666666666666666),
        weightOut: new BigNumber(0.3333333333333333),
        swapFee: new BigNumber(0.005).times(BONE),
    },
    {
        id: '0x31670617b85451E5E3813E50442Eed3ce3B68d19',
        balanceIn: new BigNumber(14.305796722007608821).times(BONE),
        balanceOut: new BigNumber(376.662367824920653194).times(BONE),
        weightIn: new BigNumber(0.6666666666666666),
        weightOut: new BigNumber(0.3333333333333333),
        swapFee: new BigNumber(0.000001).times(BONE),
    },
];

describe('Two Pool Tests', () => {
    it('should test spot price', () => {
        var sp1 = getSpotPrice(balancers[0]);
        var sp2 = getSpotPrice(balancers[1]);

        // Taken form python-SOR, SOR_method_comparison.py
        var sp1Expected = new BigNumber(7968240028251420);
        var sp2Expected = new BigNumber(18990231371439040);

        var relDif = calcRelativeDiff(sp1Expected, sp1);
        assert.isAtMost(
            relDif.toNumber(),
            errorDelta,
            'Spot Price Balancer 1 Incorrect'
        );

        relDif = calcRelativeDiff(sp2Expected, sp2);
        assert.isAtMost(
            relDif.toNumber(),
            errorDelta,
            'Spot Price Balancer 2 Incorrect'
        );
    });

    it('should test two pool SOR swap amounts', () => {
        var amountIn = new BigNumber(0.7).times(BONE);
        var swaps = smartOrderRouter(
            balancers,
            'swapExactIn',
            amountIn,
            10,
            new BigNumber(0)
        );

        // console.log(swaps[0].amount.div(BONE).toString())
        // console.log(swaps[1].amount.div(BONE).toString())
        assert.equal(swaps.length, 2, 'Should be two swaps for this example.');

        // Taken form python-SOR, SOR_method_comparison.py
        var expectedSwap1 = new BigNumber(635206783664651400);
        var relDif = calcRelativeDiff(expectedSwap1, swaps[0].amount);
        assert.isAtMost(relDif.toNumber(), errorDelta, 'First swap incorrect.');

        var expectedSwap2 = new BigNumber(64793216335348570);
        relDif = calcRelativeDiff(expectedSwap2, swaps[1].amount);
        assert.isAtMost(
            relDif.toNumber(),
            errorDelta,
            'Second swap incorrect.'
        );
    });

    it('should test two pool SOR swap amounts highestEpNotEnough False branch.', () => {
        var amountIn = new BigNumber(400).times(BONE);
        var swaps = smartOrderRouter(
            balancers,
            'swapExactIn',
            amountIn,
            10,
            new BigNumber(0)
        );

        // console.log(swaps[0].amount.div(BONE).toString())
        // console.log(swaps[1].amount.div(BONE).toString())
        assert.equal(swaps.length, 2, 'Should be two swaps for this example.');
        assert.equal(
            swaps[0].pool,
            '0x31670617b85451E5E3813E50442Eed3ce3B68d19',
            'First pool.'
        );
        assert.equal(
            swaps[1].pool,
            '0x165021F95EFB42643E9c3d8677c3430795a29806',
            'Second pool.'
        );

        // Taken form python-SOR, SOR_method_comparison.py with input changed to 400
        var expectedSwap1 = new BigNumber(326222020689680300000);
        var relDif = calcRelativeDiff(expectedSwap1, swaps[0].amount);
        assert.isAtMost(relDif.toNumber(), errorDelta, 'First swap incorrect.');

        var expectedSwap2 = new BigNumber(73777979310319780000);
        relDif = calcRelativeDiff(expectedSwap2, swaps[1].amount);
        assert.isAtMost(
            relDif.toNumber(),
            errorDelta,
            'Second swap incorrect.'
        );
    });

    // Check case mentioned in Discord
});
Now to learn the basics of TypeScript. For this I’m using the React-TypeScript Cheatsheet and the first suggestion is to get familiar with TypeScript by following 2alitys guide which I’m working through next.
My entry was a bot that does arbitrage between two Uniswap exchanges using an Aave Flashloan as the capital for initial trade. The Aave judges were “super impressed” with my work and I got a special mention for the way I overcame a testnet problem by forking UniSwap and customising the code to allow two trading between two exchanges with the same token.
This is quite random but I had to learn a few things so worth taking note.
I was recently working on a Truffle Dapp. I had to deploy one of my contracts in a roundabout way – basically one account signing it but another paying the gas (Metatransactions are basically the same). I’d never done this before. After that I still wanted my Truffle Dapp to be able to access the deployed contract but this required a bit of a tweak. So here’s how I did it.
Deploying Via A Delegate
This was done using a simple node script and the process looks like this:
Unlock your ‘sender’ account and ‘delegate’ account
Compile the smart contract to get the bytecode
In this case I used Truffle to compile and accessed the bytecode from the artificat file
Create a transaction object with the bytecode as the call data
Sender signs the transaction object
Delegate sends the signed transaction
Note the receipt so you have access to the deployed contract address
I’ve included the code I used for this below.
Using Truffle With The Deployed Contract
Because the contract was deployed using the script the Truffle artificats, etc don’t have the required information so my Dapp couldn’t interact. By making a few manual changes I managed to get it to work:
Make sure your contract has been compiled previously using Truffle it should have an artifact file.
Find your Truffle artificat file for the contract. It should be of form YouContract.json and is probably under a ‘contract’ folder in your Dapps project.
Find the “networks” section of the artificact.
Add a new network entry with the following info:
Network ID – should be the network that you deployed to.
Address – The address your contract was deployed to (from the receipt)
TransactionHash – I don’t think this is actually required but it was handy to record it.
My entry is shown in the gist below.
That’s it! Your Dapp should now work with the deployed contract.
In April I entered (and won!) the NuCypher+CoinList hackathon. I didn’t actually know much about the NuCypher tech before I got started but once I had built my DApp it was clear this is really interesting stuff and it’s stuck with me ever since as something interesting to build on.
Proxy Re-encryption
The NuCypher solution will eventually provide a decentralised privacy infrastructure but during the hackathon I was mainly making use of a subset of the tech, Proxy Re-encryption.
Proxy re-encryption is a set of encryption algorithms that allow you to transform encrypted data. Specifically… it allows you to re-encrypt data — so you have data that’s encrypted under one set of keys, you can re-encrypt the data without de-encrypting it first, so that now it’s encrypted under a second, different set of keys —NuCypher co-founder MacLane Wilkison
So What?
To understand why this is pretty awesome imagine I have some encrypted data I want to share with Bob, what are the options to do this?
Crazy way – I just give me private encryption key to Bob (who I’m sharing the data with) who can use it to decrypt the data. But now Bob has my key and who knows where this ends up.
Inefficient way – I decrypt the encrypted data then rencrypt it using Bobs public key. This is more secure for sure but I have to do a lot more work. What if I have to do this many times? What if the encrypted data is stored and accessed over a network? Hows the information all being shared? Intensive!
How about the Proxy Re-encryption way:
With Proxy Re-encryption I encrypt the data once.
The encrypted data can be stored anywhere — Amazon, Dropbox, IPFS, etc. I only need to upload it once and provide access to the Proxy service (eventually this will be a NuCypher decentralised service)
The Proxy can rencrypt the data for anyone else I choose (provided I have their public key) efficiently and without ever having access to the decrypted data.
Bob decrypts the data using his own key and resources.
If the data I’m sharing is a stream, i.e. a Twitter feed, then I can enable/revoke decryption access whenever I want — i.e. I can stop someone seeing the data.
NuCypher will eventually provide a decentralised privacy infrastructure which will replace a centralized proxy with a decentralized network. A really good overview of the NuCypher solution is here.
Combine all this with decentralised smart contract as a source of access — very cool!
My DApp was innspired by Simon de la Rouvieres This Artwork Is Always On Sale where he implements a Harberger Tax on the ownership of a digital artwork. In my app, instead of an artwork, access to a feed of data is always for sale. NuCypher is used to encrypt the data and only the current Patron can decrypt (using NuCypher) to get access. Anyone can buy this access from the current Patron for the sale price set when they took ownership. Whilst they hold ownership they pay a 5% fee to the feed owner. In the demo app the data is a Twitter like feed but the concept could be extended to have more than one Patron and could also be used for other kinds of feed data such as sensor data, camera/video feeds, music, etc.
I was super happy to get a mention in Token Economy as Stefanos favourite entry!
Lately I’ve been helping out on the open source burner-wallet app created by Austin Thomas Griffith. The idea behind it was to try and create an app that could exchange value using a mobile web browser. It trades off the complexity and best practices of storing private keys, downloading apps, etc to just make something that should be easy to get started with and easy to use.
One of the functions I found the most interesting was the ability to send some value, in this case xDai, to someone using a link (try out the app here). The functionality behind this method is pretty cool and makes use of a lot of web3/crypto fundamentals. I found it interesting to dig into it and thought it would be worth sharing.
To Begin
First of all, the Dapp isn’t really ‘sending’ the xDai, it’s more of a deposit/claim pattern with some cool cryptography used to make sure only the person with the correct information, provided by the sender via the link, can claim the value.
Secondly there are two parts — the web Dapp and the smart contract on the blockchain. The web Dapp is really just a nice way of interacting with the smart contract.
Step By Step
A step by step description helped me get it into my head. Please note that I’m not showing all the details of the code here, it’s more a high level description to show the concept.
Sending
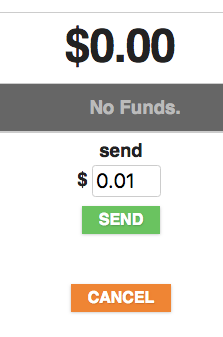
Using the Dapp the ‘sender’ enters the amount they want to send from and hits send.
App Send Screen
Once send is hit the Dapp does a bit of work in the background to get the inputs required by the smart contract set-up.
let randomHash = web3.utils.sha3("" + Math.random());
Now the Dapp uses web3.js to generate a random account which will have a private key and a public key:
let randomWallet = web3.eth.accounts.create();
The random hashed data is then signed using the random wallet private key (see below for more details on signing, etc):
let sig = web3.eth.accounts.sign(randomHash, randomWallet.privateKey);
The Dapp sends a transaction to the blockchain smart contract with the value equal to the amount that is being sent along with the signature and the hashed data:
Contract.send(randomHash, sig.signature), 140000, false, value ...
// This is just a pseudo code to give the gist, see the repo for the full code
The smart contract contains a mapping of Fund structures to bytes32 ID keys:
struct Fund {
    address sender;
    address signer;
    uint256 value;
    uint256 nonce;
    bool claimed;
}

mapping (bytes32 => Fund) public funds;
When the Dapp ‘sends’ the value the smart contract creates a new Fund structure with the signer field set to the public key of the random wallet created by the Dapp. This field is important as it is used as the check when a claim is made:
Now the newFund is mapped using the randomHash value as the key:
funds[randomHash] = newFund;
The xDai from the sender has now been sent to the smart contract and is ready to be claimed by anyone with the required information.
Finally the Dapp generates a link with the randomHash and random wallet private key as the link parameters:
Link Format: xDai.io/randomHash;privateKey
The link can then be copied and sent via WhatsApp, SMS, etc.
The Claim:
Here it’s probably worth noting the link is really just a nice way to share the important information required to claim the xDai. The Dapp also does the hard work of interacting with the blockchain smart contract.
When the link is visited the Dapp parses the randomHash and the privateKey from the link.
It then signs a message using the privateKey from the link:
let accountHash = web3.utils.sha3(claimAccount);
let sig = web3.eth.accounts.sign(accountHash, privateKey);
Now the smart contract claim function is called using the signature and the original data:
The Solidity ecrecover function is used to get the public address from the signature (this is the magic, see the info below):
address signer = recoverSigner(accountHash, sig);
Finally, the smart contract checks the fund with key matching randomHash has the ‘signer’ equal to the address recovered from the signature. If it does then it can send the value to the claimers account:
Phew, that’s it! It feels like a lot going on but the basics is it’s a smart way for a user to store value in a smart contract that can only be claimed with the correct information without showing what that information is on the public blockchain.
The Cool Crytography
Signing, ecrecover, eh what?? There’s some things that are probably worth going into a bit more detail.
Wallets, Accounts, etc
An account generated with web3.eth.accounts.create() has it’s own a private key and public key. More info can be found in the docs and here. The private and public keys are linked through an algorithm that has signing and validation properties.
Signing is the act of a user “signing” data that anyone can validate came from that user.
The signing function will take in a private key and the data. The output will be another string that is the signature.
To validate the signature is from the owner of the private key the signature, the original data and the public key is required.
A validator function is run that recovers the public key from the signed data.
The recovered public key is then compared to the original one and if both are the same the signature is valid.
ecrecover
In this case the Solidity ecrecover (Eliptic Curve Recover) function is used to recover the address associated with the public key. The recoverSigner function in the smart contract code shows an example of how this is done and this is a pretty decent explanation of what is going on.
I think that’s a pretty awesome example of crypto in action!