DApp Learnings  –  Storing & Iterating a Collection

I’ve been working on a rock, paper, scissors Ethereum DApp using Solidity, Web3 and the Truffle framework. I hit a few difficulties trying to replicate functionality that would normally be trivial in a non blockchain world so I thought I’d share what I learned.

My first thoughts for the DApp was to display a list of existing games that people had created. Normally if I were doing something like this in Django I’d create a game model and save any new games in the database. To display a list of existing games on the front end I’d query the db and iterate over the returned collection. (I realise storage is expensive when using the Ethereum blockchain but I thought trying to replicate this functionality would make sense and would be a good place to start.)

Solidity

Structures

While investigating the various data types that could be used I found the Typing and Your Contracts Storage page from Ethereum useful. I settled on using a struct, a grouping of variables, stored under one reference.

struct Game {
   string name;
   uint move;
   bool isFinished;
   address ownerAddress;
   uint stake;
   uint index;
}

That handles one game but I want to store all games. I attempted to do this in a number of different ways but settled on mapping using the games index as the key. Every time a new game is added the index is incremented so I also use gameCount to keep count of the total games.

mapping (uint => Game) games;
uint gameCount;

struct Game {
        string name;
        uint move;
        bool isFinished;
        address ownerAddress;
        uint stake;
        uint index;
    }

To add a new game I used this function:

function StartGame(uint moveId, string gameName) payable {
      require(moveId >= 0 && moveId <= 2);
      games[gameCount].name = gameName;
      games[gameCount].move = moveId;
      games[gameCount].isFinished = false;
      games[gameCount].ownerAddress = msg.sender;
      games[gameCount].stake = msg.value;
      games[gameCount].index = gameCount;
      gameCount++;
}

I also added a function that returns the total number of games:

function GetGamesLength() public returns (uint){
   return gameCount;
}

Returning A Structure

Next I want to be able to get information about a game using it’s index. In Solidity a structure can only be returned by a function from an internal call so for the front end to get the data I had to find another way. I went with the suggestion here — return the fields of the struct as separate return variables.

function GetGame(uint Index) public returns (string, bool, address, uint, uint) {
    return (games[Index].name, games[Index].isFinished, games[Index].ownerAddress, games[Index].stake, games[Index].index);
}

Front End

On the front end I use Web3 to iterate over each game and display it. To begin I call the GetGamesLength() function. As we saw previously this gives the total number of games. Then I can iterate the index from 0->NoGames to get the data for each game using the GetGame(uint Index) function.

When my page first loads it calls:

getGames: function() {
    var rpsInstance;
    App.contracts.RpsFirst.deployed().then(function(instance) {
      rpsInstance = instance;
      return rpsInstance.GetGamesLength.call();
    }).then(function(gameCount) {
      App.getAllGames(web3.toDecimal(gameCount), rpsInstance);
    }).catch(function(err) {
      console.log(err.message);
    });
  },

Web3 – Promises, Promises & more Promises…

The getAllGames function calls GetGame(uint Index) for each game. To do this I created a sequence of promises using the method described here:

getAllGames: function(NoGames, Instance){
   
   var sequence = Promise.resolve()

   for (var i=0; i < NoGames; i++){(function(){  
         var capturedindex = i
         sequence = sequence.then(function(){
            return Instance.GetGame.call(capturedindex);
         }).then(function(Game){
            console.log(Game + ' fetched!'
            // Do something with game data. 
            console.log(Game[0]); // Name
            console.log(Game[1]); // isFinished
         }).catch(function(err){
            console.log('Error loading ' + err)
         })
      }())
   }
}

Conclusion

Looking back at this now it’s all pretty easy looking but it took me a while to get there! I’m still not even sure if it’s the best way to do it. Any advice would be awesome and if it helps someone even better.

Token Models – Storm

Storm

Storm are another interesting crypto company that are planning to do an ICO for their Storm Token in the near future so it’s worth investigating how their token model works.

Storm Background

Storm plan to release a number of DApps:

Storm Play: Storm already have a product called BitMaker (1.2M+ downloads across 187 countries) which they are rebranding as Storm Play and integrating to the Storm products.

Storm Market:  A decentralised micro-task marketplace.

Storm Shop: Opportunities where users can learn about or sample retail
goods and services (no real info on this yet).

How It Works

The service is relatively simple, and I see this is as a positive. The basics of the service are described below:

“Makers” and “Players” meet each other to buy and sell tasks.

“Storm Makers,” post tasks using the Storm Play app. To post a task you are required to pay using STORM tokens.

“Storm Players,” use the Storm Play app to perform tasks. Players receive reward units called Bolts in return.

Bolts may not be transferred off of Storm Market but are redeemable for STORM Tokens.

Players can also earn Bolts as part of the gamified reward system (see below). Players can be rewarded for:

  • Creating tasks
  • Completing tasks
  • Managing other Storm Players that a person referred in to complete a task
    successfully
  • Helping categorize a task or helping to rank a task

These Bolts can be used for boosts. Boosts give the Storm Player access to more micro-tasks for a certain period of time

Token Analysis

As I did the last time, working through the twenty questions proposed by William Mougayar in Tokenomics — A Business Guide to Token Usage, Utility and Value really helps to think about how the tokens are used:

I found it more difficult to answer some of these and I’m not 100% convinced with some of my answers. For now I think the tokens offer the following utility:

The Value Exchange

Players are rewarded Bolts for tasks such as categorising a task or helping to rank a task. These Bolts can be used for boosts. Boosts give the Storm Player access to more micro-tasks for a certain period of time which should lead to more tasks being completed. Think this is maybe clutching a little to meet Mougayars definition, there’s not a real transactional economy between buyers/sellers as there’s not much to spend Bolts on but I think this will develop.

The Toll

Makers are required to pay for posts in STORM tokens. Also Players have to pay Bolts to boost.


The Currency

Reduces traditional payment fees.

Conclusion:

Overall score is 9/20. I’m not surprised it’s a fairly low score as my gut feeling is that apart from reducing fees the token isn’t intrinsic to the business plan. Micro-tasks and tokens fit well but they don’t need each other. I do still like the  though and maybe ‘only’ reducing fees is enough – especially with the current industry leaders charging up to 40% (see whitepaper).

Gamification:

Whilst not blockchain technology specific the gamification aspect is interesting and is a big strength for the Storm team so I thought I’d investigate it a bit further in this section.

The main goal of embedding a ‘gamification’ layer to the Storm Market platform is to make it effective in reaching objectives for boosting and delivering business results, like ROE (Return on Engagement). Storm Play can make monotonous work much more enjoyable through a gamified platform.

Unlike previously cited freelance platforms too, gamification is a very important aspect of Storm’s ecosystem. Makers post tasks on the market and Players execute those tasks in exchange of different kinds of rewards (including money) that make the whole thing a fun experience.

To gamify the progression of its users, Storm uses “Bolts” as units of a rewarding system. Users can earn Bolts by doing micro-tasks and by doing training tasks to improve their skills. As their experience increase, they are assigned more micro-tasks. But your experience level on the Storm market is not tied to your Bolts, they are an artifact of it. You can actually use them to get “boosts”: “Within Storm Market, Storm Players can use their balance of Bolts for boosts. Boosts give the Storm Player access to more micro-tasks for a certain period of time”

Links

Storm Website

Analysis of Storm ICO

Token Models – Grid+

Grid+

In my previous post I stated I would try to learn more about token models and the associated technology by investigating crypto companies. First up a company called Grid+.

Grid+ aims to be a utility provider that exposes its customers to wholesale electricity prices. I really like their blog posts, they put a lot of effort into explaining the thought process behind the company. One of the co-founders, Alex Miller, actually encourages criticism and I think his transparency is refreshing. They’re one of the few companies who actually go into details about how blockchain technology can be used in a real life business and reading their posts really helps to develop my understanding of this technology.

Grid+ Value

First up it’s useful to look at what value Grid+ can potentially bring to a customer.

Grid+ want to expose its customers to wholesale electricity prices. Traditional utilities use fixed prices which are not market driven but wholesale prices vary throughout the day. Grid+ will offer prices both for consumed and generated energy based on the wholesale price (with a relatively small markup for most customers). This means customers have the opportunity to buy electricity when it is cheap, store it in batteries and sell when the price goes up. To me that’s pretty cool by itself.

The plan is to operate using the existing grid infrastructure. In theory thats a smart way to save costs, especially to start-up. From the description of how the system will work (see below) I wonder if this might potentially restrict them.

They place a lot of emphasis on giving their users ‘agency‘ which means users control the sending of funds, etc. In this system there is minimal human administration and minimal credit risk. Ultimately this keeps the price low for customers by avoiding traditional costs associated with admin, etc.

An IoT ‘Agent’ device is used to automatically handle payments via the Ethereum network. The goal is to create a p2p market between Grid+ agents. A customer who has electricity to sell can offer it at a local rate lower than the nearest wholesale rate. They will get bought out by another customer  with the two customer Agents handling payments via a Grid+ hub on the Raiden network.

Grid+ acts as the bridge between the old world of traditional energy suppliers and the new world of prosumers and p2p transactions.

They also have ambitions to make the Agent ‘smart’ to help the customer purchase the cheapest electricity possible. The Agent can be connected to other sensors such as thermostats, it will then predict energy usage and save money on energy purchasing.

Ultimately these are all potentially smart ways to provide cheaper electricity to the customer.

Tokens

Grid+ Tokens

Grid+ will operate with a two-token model, a BOLT token and a GRID token.

The BOLT token will be treated by Grid+ as a stable-coin, redeemable by Grid+ customers for $1 worth of energy from Grid+ and backed by USD deposits.

The GRID token will allow Grid+ customers to purchase electricity from Grid+ at wholesale price. 1 GRID token = 500 kWh at the wholesale price.

Token Evaluation

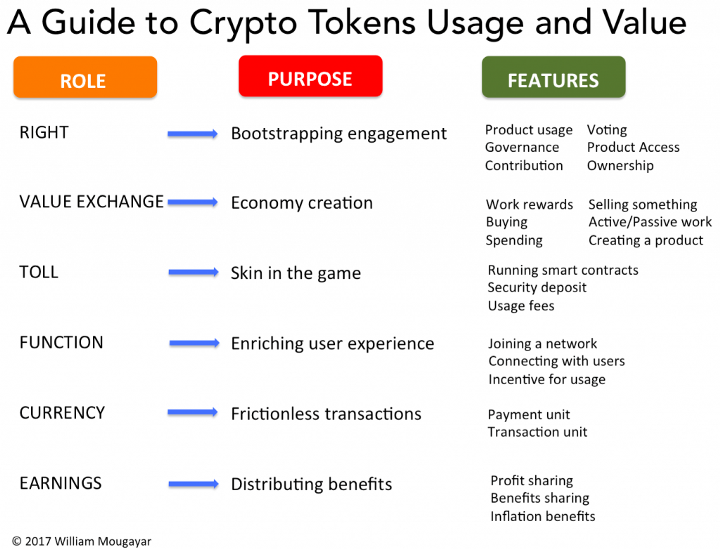
Working through the twenty questions proposed by William Mougayar in Tokenomics — A Business Guide to Token Usage, Utility and Value really helps to think about how the tokens are used:

QuestionBOLTGRID
Is the token tied to a product usage, i.e. does it give the user exclusive access to it, or provide interaction rights to the product?Yes
Provides access to Grid+ energy.
Yes
1 GRID token = 500 kWh at the wholesale price.
Does the token grant a governance action, like voting on a consensus related or other decision-making factor?NoNo
Does the token enable the user to contribute to a value-adding action for the network or market that is being built?Yes
Selling generated electricity on a p2p network.
No
Does the token grant an ownership of sorts, whether it is real or a proxy to a value?Yes
Ownership of energy.
Yes
Ownership of wholesale energy.
Does the token result in a monetizable reward based on an action by the user (active work)?Yes
Any revenue earned by a customer from selling electricity is earned in BOLT tokens instead of fiat and is stored on the Agent.
No
Does the token grant the user a value based on sharing or disclosing some data about them (passive work)?NoNo
Is buying something part of the business model?YesYes
Is selling something part of the business model?YesNo
Can users create a new product or service?NoNo
Is the token required to run a smart contract or to fund an oracle? NoNo
Is the token required as a security deposit to secure some aspect of the blockchain’s operation?NoNo
Is the token (or a derivative of it, like a stable coin or gas unit) used to pay for some usage?Yes
Pay for used electricity.
No
Is the token required to join a network or other related entity?Yes
Can't join Grid+ network without token.
No
Does the token enable a real connection between users?Yes?
Allows p2p payments between users.
No
Is the token given away or offered at a discount, as an incentive to encourage product trial or usage?NoYes
I think it incentivises people to start using Grid+.
Is the token your principal payment unit, essentially functioning as an internal currency?YesNo
Is the token (or derivative of it) the principal accounting unit for all internal transactions?I think this is a yes although it may be kW instead.No
Does your blockchain autonomously distribute profits to token holders?Yes
Agents are automatically updated.
No
Does your blockchain autonomously distribute other benefits to token holders?Yes
Possibly Casper, etc?
No
Is there a related benefit to your users, resulting from built-in currency inflation?NoNo
Total13/204/20

Which leads to the conclusion that the tokens offer the following utility:

The Value Exchange

The BOLT token is a unit of value that allows the buying and selling of energy between Grid+ and users and also user to user.

Users can also earn BOLTS by generating and selling electricity or by arbitrage.

The Toll

It’s obvious that the BOLT token is used to pay for electricity used but I feel like I’m not 100% on this one. Maybe it’s because a token isn’t essential for this function. In the User Agency post Alex does admits this part could be done using a traditional infrastructure.

The Function

As far as I can see the GRID token is mainly for. It is offering a discount that encourages users to use Grid+ services.

The Currency

Traditional payment processing fees and admin costs are reduced.

p2p payments are made economically and technologically viable.

Conclusions

I’m not sure if 13/20 is considered a high score but my feelings are the BOLT token utility more than proves itself essential to the business model.

Initially I was sceptical about the use of the GRID token but after working through the questions I can see it’s potentially a really nice way to incentivise people to start using the service.

There are also some other interesting opportunities described in the post Casper, Plasma, and the Grid+ Agent that demonstrates the Grid+ team are super innovative when it comes to  using blockchain technology and are still exploring new ideas – it must be a cool place to work! I think the last paragraph from Alex Millers The P2P Grid We All Want post demonstrates this:

However, this brainstorming session is likely an exercise in futility because the future is always uncertain and we’re talking about a future that is likely a decade or more away. Nevertheless, we at Grid+ are primarily motivated by bringing forth the future of energy. If Grid+ is so successful that our customers eventually dis-intermediate us and we really have no way to make money, then perhaps we’ve accomplished what we set out to do. We as a team would be happy with an outcome that empowers the people and establishes a new, transactive grid because that would mean we will have proven the power of decentralizing technologies — as far as we’re concerned, that’s a win for humanity.
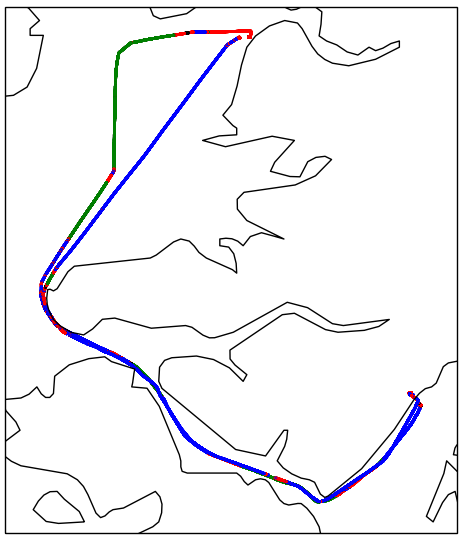
How Grid+ Will Work

The following isn’t actually that relative from the token model perspective but it’s really interesting to see the nuts and bolts of how a crypto company could function. Really cool of the Grid+ to share this.

A customer purchases an agent (a small device capable of making signatures) and claims that device based on a serial number printed on the box.

Before shipping the agent Grid+ whitelist its serial number on their registry contract.

Grid+ map that serial number to an Ethereum address, which is a function of its public key .

Agent Address – Created when device first boots up.

Owner Address – customer who enters the serial number printed on the device into the Grid+ web console.

Customers will make a refundable initial deposit then will prepay each month.

Fiat payments will be converted to USDX tokens.

Every few hours Grid+ request payment from a customers agent commensurate with the amount of energy used.

If the customer exceeds her monthly allowance (or her agent simply doesn’t pay), the customer will be notified deductions are made from her initial account deposit.

your utility company tracks how much power goes into your house and how much power goes out of your house and then sends you a bill based on the net result.

Smart meters send data to ISO. ISO makes data available via API.

Grid+ will  query the ISO (ERCOT in Texas) and bill customers’ Agents based on that usage.

Analysing Token Models

ICO’s

An ICO or Initial Coin Offering allows a company to sell its own cryptocurrency token to investors. As William Mougayar (a true Blockchain expert) states:

A [cryptocurrency] token is just another term for a type of privately issued currency.

It’s probably fair to say that at this time raising funds via an ICO is relatively easy when compared to traditional methods. There have been many successful ICOs with large amounts of cash being generated. It’s also probably fair to say that a large amount of the companies running these have no real requirement for a token and are simply accessing the ‘easy’ cash.

Some experts predict the majority of ICOs will fail but the organisations with genuine token models (and good execution) will survive and these are the ones that are innovative, valuable and interesting.

Analysing The Token Model

My plan is to analyse companies that use tokens to basically answer the question:

What does the token do that makes it essential to the business model?

This should help me to better understand the technology and identify how tokens can be used.

As a basis of the investigation I will use William Mougayars Role — Features — Purpose framework for assessing token utility as described in his post, Tokenomics — A Business Guide to Token Usage.

The chart shown below is taken from the Tokenomics post and shows the main roles a token can play.  The post itself provides great detail that I won’t repeat but is definitely worth a read. Using this and the list of questions at the end should result in a reliable conclusion on the utility of the token.

Token Utility – William Mougayar

Token Utility Questions (credit William Mougayar)

  1. Is the token tied to a product usage, i.e. does it give the user exclusive access to it, or provide interaction rights to the product?
  2. Does the token grant a governance action, like voting on a consensus related or other decision-making factor?
  3. Does the token enable the user to contribute to a value-adding action for the network or market that is being built?
  4. Does the token grant an ownership of sorts, whether it is real or a proxy to a value?
  5. Does the token result in a monetizable reward based on an action by the user (active work)?
  6. Does the token grant the user a value based on sharing or disclosing some data about them (passive work)?
  7. Is buying something part of the business model?
  8. Is selling something part of the business model?
  9. Can users create a new product or service?
  10. Is the token required to run a smart contract or to fund an oracle? (an oracle is a source of information or data that other a smart contract can use)
  11. Is the token required as a security deposit to secure some aspect of the blockchain’s operation?
  12. Is the token (or a derivative of it, like a stable coin or gas unit) used to pay for some usage?
  13. Is the token required to join a network or other related entity?
  14. Does the token enable a real connection between users?
  15. Is the token given away or offered at a discount, as an incentive to encourage product trial or usage?
  16. Is the token your principal payment unit, essentially functioning as an internal currency?
  17. Is the token (or derivative of it) the principal accounting unit for all internal transactions?
  18. Does your blockchain autonomously distribute profits to token holders?
  19. Does your blockchain autonomously distribute other benefits to token holders?
  20. Is there a related benefit to your users, resulting from built-in currency inflation?

Python & Redis PUB/SUB

I recently had an issue where I have three Python scripts that need to be started on my RaspberryPI when it boots. Script 1 is identifying what serial devices are attached to the PI, saving the information to a database. Scripts 2 and 3 need to use this information, so have to wait until script 1 has completed.

I wasn’t sure of the best way to do this but I thought of a method that lets me experiment with Redis PUB/SUB which I’ve wanted an excuse to use for a while!

My Scripts

The redis-py Python Client is well documented and really easy to use. I created a function, RedisCheck(), that Scripts 2 & 3 call when they start. The function subscribes to a Redis channel called ‘startScripts’. It then goes into a loop until it receives a ‘START’ message on that channel. Once this is received the main scripts can continue with their primary jobs.

Script1 is very simple, the ‘START’ message is PUBLISHED via the ‘startScripts’ channel once the main work is done.

The following code should demonstrate how easy the code was to write and it works really well.

RedisCheck() SUB for Scripts 2 & 3

Script 1 PUB START

Publishing Via The Command Line

Another nice thing I found was how easy it was to PUBLISH the ‘START’ message using the redis-cli. All I do is run:

# redis-cli

> PUBLISH startScripts START

This is really useful if I’m debugging and so easy to do. Overall I really like Redis.

Python Map Plotting Using Cartopy

Cartopy Plot of Scotland

Recently I’ve been using Python and Cartopy to plot some Latitude/Longitude data on a map. Initially it took some time to figure out how to get it to work so I thought I’d share my code incase it was useful.

According to the Cartopy intro it is

“a Python package designed to make drawing maps for data analysis and visualisation as easy as possible.”

I’m not sure how active the project is and I found the documentation a bit lacking but once I was up and running it was pretty easy to use and I think the results look pretty good.

Plotting My Data

I have a csv file with various data timestamped and saved on each line. For this case I was interested in the lat/lng location, signal strength (for an antenna) and also a satellite number. An example of one line of data is:

2017–07–10 22:31:59:203,Processing UpdatePacket: [‘:’, ‘1’, ‘0’, ‘0’, ‘1’, ‘0’, ‘0’, ‘1.63’, ‘17.15’, ‘246.57’, ‘114.11’, ‘57.008263’, ‘-5.827861’, ‘310.00’, ‘1’, ‘NAN’, ‘0’, ‘2’, ‘0’, ‘c\n’]

and from that the information I require is:

lat/lng position: 57.008263,-5.827861
signal strength: 1.63
satellite number: 310.00

Initially for each lat/lng position I wanted to plot the point on a map and colour the marker at that point to show which satellite number it was. Also if the signal strength was -100 the marker colour should be shown as red. An example taken from some of the data is shown below.


Lat/Lng Plots with different zoom level

The following Gist shows the Python script I used:

Script Details

Most of the script is actually concerned with reading the file and parsing the relevant data. The main plotting functionality is in the section:

ax = plt.axes(projection=ccrs.Mercator()) # Map projection
ax.coastlines(resolution=’10m’)           # Adds coastline to map at highest resolution

plt.scatter(lngArr, latArr, s=area, c=satLngArr, alpha=0.5, transform=ccrs.Geodetic())                # Plot
plt.show()

The projection sets the coordinate system and is selected from the Cartopy projection list (there’s a lot to pick from and I chose the one I thought looked the best).

Next a coastline is added to the projection. As I was focusing on a small section of Scottish coastline I went with the 10m resolution which is the highest but lower resolutions can be selected as detailed in the documentation.

Finally a scatter plot is created. The data has been parsed into equal sized lists of longitude and latitude points.

The ‘s’ parameter defines the size of the marker at each point, in this case all set to 1pt radii.

The ‘c’ parameter defines the colour of the marker, in this case blue for satellite 310, green for 60, yellow for 302, black for any other satellite and red if signal strength is -100.

Finally the transform=ccrs.Geodetic() sets the lat/lng coordinate system as defined here.

Scaling Marker Size

It’s also possible to adjust the radius of the marker at each point. To scale it relative to the signal strength (I removed the -100 strengths):

area = np.pi * (strengthNpArray)**2

Which gives:


Marker scaled to strength at point

Scotcoin

Earlier this week I attended the Scotcoin & the blockchain meetup at Napier University. It was a Q&A session, there must have been around 25 people there and it was an informative and interesting evening.

The two Scotcoin representatives were approachable and enthusiastic and seemed genuinely pleased to host the meetup and field the questions. The attendees were a mixed bag of crypto geeks, anti-establishmenters and nationalists. Some with pretty passionate opinions they weren’t scared to show.  It led to a pretty entertaining interaction. In a way I think the mix of people reflected the mixed Scotcoin vision.

Scotcoin was initially conceived during the build up to the 2014 Scottish Independence Referendum. At this time it was unclear what the currency situation would be if Scotland went independent and Scotcoin was a potential solution. As an ambitious, alternative solution to the currency issue I think it was quite smart (although I doubt the Scottish Government would have had the vision or courage to implement it).

However, Scotland didn’t become independent…The original Scotcoin founder left the project and a new investor/team took over. At that point I think it became less an idealistic vision and more like a way for some people to make money. -which is fair enough.

Nevertheless, according to the Business Model Canvas, a successful product must:

“Provide value to the customer by resulting in the solution of a problem the customer is facing or providing value to the customer.”

Without the need for an alternative to the GBP Scotcoin no longer seems to meet these requirements.

The official project line was that “Scotcoin will grow the Scottish economy by offering small business owners benefits.” When questioned on what those benefits are the only one suggested was lower transaction fees – a benefit that more established cryptocurrencies like Bitcoin (which Scotcoin is basically modelled on) already provide.

There was mention of the development of other features, but these couldn’t be discussed and I struggle to see the team having enough talent or vision to truly innovate. Whilst I hope the project doesn’t fail, for now, like a lot of crypto projects out there I think it’s mainly fueled on pure speculation.

DApp – My First Solidity Contract

As explained in my previous post my first smart contract is based on the “Withdrawal from Contracts” example from the Solidity Common Patterns documentation. In this post I review some of the Solidity code I learned.

Smart Contract Intro

The example in the documentation was inspired by the King of the Ether game and the rules of the contract are:

  • To play a user submits a value of X Ether paid from his address
  • If X > historicHighest:
  • user is king
  • old king can collect previous payments
  • historicHighest = X

The contract itself is:

pragma solidity ^0.4.2;

contract WithdrawalContract {
    address public richest;
    uint public mostSent;
    mapping (address => uint) pendingWithdrawals;

    function WithdrawalContract() payable {
        richest = msg.sender;
        mostSent = msg.value;
    }

    event BecameRichestEvent(address sender, uint amount);
    event FailedRichestEvent(address sender, uint amount);
    event Collected(uint amount);

    function BecomeRichest() payable returns (bool) {

        if (msg.value > mostSent) {
            pendingWithdrawals[richest] += msg.value;
            richest = msg.sender;
            mostSent = msg.value;
            BecameRichestEvent(msg.sender, msg.value);
            return true;
        } else {
            FailedRichestEvent(msg.sender, msg.value);
            return false;
        }
 }

function withdraw() {
    uint amount = pendingWithdrawals[msg.sender];
    // Remember to zero the pending refund before
    // sending to prevent re-entrancy attacks
    pendingWithdrawals[msg.sender] = 0;
    msg.sender.transfer(amount);
    Collected(amount);
 }
}

Solidity Specifics

I found this Introduction to Smart Contracts documentation a good source of information.

Addresses – address public richest;

Type address — holds a 20byte Ethereum address. Here it’s used to save the address of the user who is currently the richest.

public allows other contracts to access the variable.

An address has various member functions as detailed here. One of these is address.transfer(uint256 amount) which sends the given amount of Wei to the address. In this case transfer is used in the Withdraw function to safely send Ether to a valid users address.

Mappings - mapping (address => uint) pendingWithdrawals;

The next line, mapping (address => uint) public balances; also creates a public state variable, but it is a more complex datatype.

Mappings can be seen as hash tables. pendinWithdrawals maps addresses to unsigned integers. For example:

pendingWithdrawals[0xc7975434577b0d57248e1de03fcc6f27cd6cc742] = 7;

Maps the value 7 to address 0xc7975434577b0d57248e1de03fcc6f27cd6cc742 and can be called using:

x = pendingWithdrawals[0xc7975434577b0d57248e1de03fcc6f27cd6cc742]; 

x = 7

Transactions & Constructors – function WithdrawalContract() payable

This is a constructor – a function that is run when the contract is first created.

The payable modifier means the function is a transaction. A transaction is the transfer of data between two accounts (good explanation here). A transaction contains some standard data e.g. sender address or the amount of wei being transferred. We can access the transaction data using the global msg variable.

In this case msg is used to set the initial richest address to msg.sender which is the address of the person deploying the contract. It also saves the mostSent as the msg.value which is the number of wei sent during the deployment.

Events – event BecameRichestEvent(address sender, uint amount);

The front end of the application, in my case Web3.js, listens for Solidity events being fired so it can update the interface. For example the BecameRichest event fires when a new account becomes the richest.

The event is fired by the line:

BecameRichestEvent(msg.sender, msg.value);

The listener will have access to the sender and value data passed to the call.

In the next post I plan to detail some of the front end functionality, including how to listen for events.

Ethereum Work – Beginners Sending & Receiving Eth

Intro

I’ve been following the Status project for some time and recently they announced their virtual hackathon. I’d been planning on diving into the Ethereum/Decentralised App development world and thought this would be an ideal time to start and I pretty quickly saw how powerful and relatively simple this can be.

As a complete beginner to working with the blockchain I found it better to begin by forgetting about the Status part and even the Dapp part and just see how to interact with a blockchain. Basically you can send some Eth between accounts using one function – that’s impressive.

Setup

I figured you need to get set-up with three things to get going:

1. A blockchain

Normally this would be the Ethereum blockchain but whenever you run a smart contract on Ethereum you must pay for the computation using gas. Testnets simulate the Ethereum network on you local machine and allow you to experiment for free. I installed testrpc.

2. web3.js

web3.js is a Javascript library which runs in a browser, connects to a local blockchain node and allows you to make calls on the blockchain. It does this using remote procedure calls (RPC) which basically means passing messages in JSON format.

3. Truffle

Truffle is a development environment for Ethereum that makes development a lot easier. For this exercise I’m just using the Truffle console to interact with web3.js manually. It’s way more powerful than that, which I hope show during some more posts in the future.

The Action

Start the testnet

To begin the testrpc testnet needs to be started by entering the following command:

testrpc -p 8546
This just means a simulated Eth client is listening on my laptops IP address on port 8546.
When it starts gives a list of test wallets that are loaded with 100Eth (unfortunately not real Eth, just Eth for the simulated environment). These are handy for experimenting with. My output showed:
Available Accounts
 ==================
 (0) 0xc7975434577b0d57248e1de03fcc6f27cd6cc742
 (1) 0x74dcfef837aff77d7c43d44d1d69b1eef5d708a6
 (2) 0xac63a31fd24d692997e577c02524f81eb223cd1d
 (3) 0x86fd495d744d13d43d00aa700dc9517a92eb9eae
 (4) .......

Run web3 commands

Truffle has a console tool that can be used to run web3 commands. To start it just type (keep testrpc running in separate window):

truffle console

Then try:

web3.eth.accounts

you should see a list of the same accounts you saw when you started testrpc.

Send send send

So now the really cool part. To transfer Eth between accounts all you need to enter is:

var sender = web3.eth.accounts[0];
Which shows the first address in your list, in my case: ‘0x72ddd46949fddd6add06d99a3f64357a18506470′
var receiver = web3.eth.accounts[1]
Which shows the second address in your list, in my case:
‘0x05fc7ea9e73061234d45381e8cc2e1995d4d02da’
To show the current balances in both accounts:
web3.eth.getBalance(sender)

web3.eth.getBalance(receiver)

These should both return,

{ [String: '100000000000000000000'] s: 1, e: 20, c: [ 1000000 ] }
which shows 100Eth in both accounts.
We’ll transfer 0.01Eth:
var amount = web3.toWei(0.01, 'ether')
 And the actual transfer (this could have been run by itself right from the start but the above steps make the process a bit clearer):
web3.eth.sendTransaction({from:sender, to:receiver, value: amount})
 This returns a transaction address like: ‘0x9e9963f4782b4248b2cd42d8af17e85d64d049e052da335e3517f4a8a69aa064’
To confirm the transfer we can check the balances again:
web3.eth.getBalance(sender) this time shows:
{ [String: ‘99989999999999979000’] s: 1, e: 19, c: [ 999899, 99999999979000 ] }
web3.eth.getBalance(receiver) this time shows:

{ [String: ‘100010000000000000000’] s: 1, e: 20, c: [ 1000100 ] }

So 0.01Eth has been transferred!
If you look in your testrpc window you should see the transaction information on the blockchain, something like:
0x9e9963f4782b4248b2cd42d8af17e85d64d049e052da335e3517f4a8a69aa064
 Gas usage: 0x5208
 Block Number: 0x01
 Block Time: Tue Jun 06 2017 19:34:54 GMT+0100 (BST)

So with as little as one command you can transfer value electronically, cryptographically proven and with minimal fee. From a pure tech geek point of view that’s awesome, no wonder people get excited about this stuff!

Antenna Arrays And Python – The Array (finally!)

As mentioned in my intro post an array antenna is a set of individual antennas connected to work as a single antenna. So far we’ve covered the individual antennas, i.e. the square patches, now it’s time to look at how they can be connected to work together.

Array Factor Fun

You can’t get far digging into arrays before you come across the Array Factor. It looks complicated but to me the easiest way to think of it is that it combines every elements position, radiating amplitude and radiating phase to give the overall array performance.

The Array Factor demonstrates that by altering an element, such as its position or phase, we can alter the arrays properties. For example the arrays beam could be steered to a desired position by altering the phase of each element.

The Array Factor is given by:

Where:

θ, φ = Direction from origin

N = number of elements

An= Amp of element

βn = Phase of element in rads

k0 = 2π/λ rads/m

And:

is the relative phase of incident wave at element n located at xn, yn, zn.

Array Factor in Python

The script below shows how easy it is to calculate the Array Factor in Python:

Array Radiation Pattern, Directivity & Gain

The above Array Factor equation is independent of each elements individual radiating pattern. The overall radiation pattern of an array is determined by the array factor combined with the radiation pattern of each element, Fn(θn, φn), giving:

The overall radiation pattern results in a certain directivity and thus gain linked through the efficiency as discussed previously.

Some Examples

To demonstrate the effects the individual element patterns have on the overall array performance we can investigate some examples using Python.

Isotropic antenna elements

In this case each element radiates equally in all directions so Fn(θn, φn) is the same for each θn, φn. The antenna radiation pattern is now just the Array Factor as described in the code above.

15×15 Array of Isotropic Elements

Patch antenna elements

Using elements described by the PatchFunction discussed previously:

PatchFunction(θ, φ, Freq, 10.7e-3, 10.47e-3, 3e-3, 2.5)
15×15 Array of patches

Python script for patch array:

Horn antenna elements

And finally using horn antenna elements represented by cos²⁸(θ) function.

15×15 Array of cos²⁸(θ) Horns

Python script for horn array:

Next time we can see how to calculate an elements phase to steer the beam.