🧘♂️ “If you’re on a great journey at work, doing something meaningful, and the team appreciates you — maybe lean in there” – thought this post had some really good advice
I’ve been enjoying Core Doctorows blog recently and I really liked the subtle little trick described in Against Lore 🦉
🏫 Systematic problem solving – Consume information (with a wide scope) -> Start writing -> Share the idea and get feedback -> Goto writing step and repeat
I always find WebAssembly interesting and this post shares a viewpoint on where it should be used – “where you want to compose work from separate teams, the boundaries imposed by WebAssembly can be a useful tool” 🤝
🧘♀️ Really like the section from Nadine Stair in this one – “I would, perhaps, have more actual troubles but fewer imaginary ones” and “If I could do it again, I would travel lighter than I have”.
Maestro, an OS written in Rust because its a memory safe language that avoids issues described 💻
Axiom is a really exciting new protocol that harnesses ZK technology to allow smart contracts to trustlessly compute over the history of Ethereum. I believe its a novel new primitive for others to build with. The docs provide a lot of info about the protocol itself and has a helpful tutorial that can be followed to build an Autonomous Airdrop. An SDK is provided to improve the integration experience for developers and includes a CLI, React client and Typescript and Smart Contract libraries.
One of the SC libraries provides an extension to the standard Foundry test library and has a pretty interesting setup and implementations of custom cheat codes. I thought it would be interesting to investigate this a bit further using the test from the Autonomous Airdrop example as a reference example, specifically looking at AxiomTest in some more detail.
System Overview
To appreciate why the cheat codes are beneficial its useful to have a high level overview of the Axiom system. Following the flow of the Airdrop example:
Calls the callback specified by the AxiomV2Callback in step 1
Callback runs
This allows a custom contract to make use of the results of the query and run custom logic
In the Airdrop example the AutonomousAirdrop.sol contract validates the relevant airdrop requirements and issues the token if met
When testing locally the QueryFulfillment in step 3 will not be possible which would block testing of the custom logic implemented in the callback used in step 4. That’s where the AxiomTest library can be used.
Step By Step Testing
Following AutonomousAirdrop.t.sol can show us step by step how to use AxiomTest and allows us to investigate what is going on.
Importing
AxiomTest follows the same convention as a usual Foundry Test but instead we import AxiomTest.sol and inherit from AxiomTest in the test contract:
import { AxiomTest, AxiomVm } from "@axiom-crypto/v2-periphery/test/AxiomTest.sol";

contract AutonomousAirdropTest is AxiomTest { ...
Setup
setUp() is also the same as Foundry, an optional function invoked before each test case is run. Here there’s a bit more going on:
function setUp() public {
    _createSelectForkAndSetupAxiom("sepolia", 5_103_100);

    inputPath = "app/axiom/data/inputs.json";
    querySchema = axiomVm.compile("app/axiom/swapEvent.circuit.ts", inputPath);

    autonomousAirdrop = new AutonomousAirdrop(axiomV2QueryAddress, uint64(block.chainid), querySchema);
    uselessToken = new UselessToken(address(autonomousAirdrop));
    autonomousAirdrop.updateAirdropToken(address(uselessToken));
}
Setup and run a new local fork using vm.createSelectFork(urlOrAlias, forkBlock)docs;
Using provided chainId find the addresses for axiomV2Core and axiomV2Query from local AxiomV2Addresses. These are actual deployments and currently only exist on mainnet/sepolia.
Initialise core and query contracts using the addresses and interfaces:
axiomVm = new AxiomVm(axiomV2QueryAddress, urlOrAlias, true);
AxiomVm.sol implements the cheatcode functionality as well as providing utility functions for compiling, proving, parsing args, etc.
Following initialisation of the fork, the axiomVm compile function is used to compile the local circuit and retrieve the querySchema associated to the circuit. The querySchema provides a unique identifier for a callback function to distinguish the type of compute query used to generate the query results passed to the callback and this is used as a constructor argument when creating a new AutonomousAirdrop contract.
Behind the scenes compile is using Foundry FFI to run the Axiom CLI compile command:
Finally sendQuery itself is called on the axiomV2Query contract initialised during setup using the parsed args.
Testing Callback
The test test_axiomCallback mocks step 3 in the System Overview and allows the callback to be tested.
function test_axiomCallback() public {
    AxiomVm.AxiomFulfillCallbackArgs memory args =
        axiomVm.fulfillCallbackArgs(inputPath, address(autonomousAirdrop), callbackExtraData, feeData, SWAP_SENDER_ADDR);

    axiomVm.prankCallback(args);
}
Similar to the previous test fulfillCallbackArgs uses the Axiom CLI to prove and queryParams to generate the required args for AxiomFulfillCallbackArgs. These are used in prankCallback to call the axiomV2Callback function on the AutonomousAirdrop contract (args.callbackTarget is the address) with the relevant spoofed Axiom results:
The axiomV2Callback function is inhertied from the AxiomV2Client and this function in turn calls _validateAxiomV2Call and _axiomV2Callback.
Conclusion
Following through these tests and libraries really helps to understand the moving parts in the Axiom system and hopefully the post helps others. Its exciting to see what gets built with Axiom as it becomes another core primitive!
Learnings from the KZG Ceremony, I thought the KZG ceremony was really cool and a big success. This is a great post covering the full stack. Rust/WASM/React fun 🎑
🖥️ Thread explaining single-use address that can broadcast a transaction without the need for a private key
Keep It Going – Pretty pertinent in these times! Could also be applied to other things like work, working out, maybe even a good general thesis to live by 🏋️
⚖️ BIP-19 was a bit of a special move by SolarCurve and this thread is a great explainer.
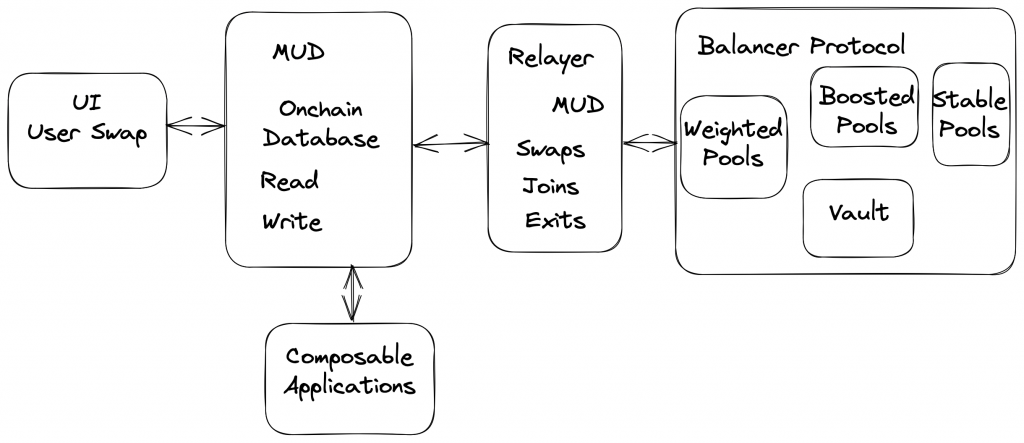
Unfortunately I have no game development skills so the idea was to see how MUD could be used with an existing DeFi protocol. In this case by creating a new Balancer Relayer that was integrated with MUD and a front end to show swap data.
From the MUD docs: “MUD is a framework for ambitious Ethereum applications. It compresses the complexity of building EVM apps with a tightly integrated software stack.” The stand out for me is:
No indexers or subgraphs needed, and your frontend is magically synchronized!
Since my early days at Balancer the Subgraph has been one of the main pain points I’ve come across. I’ve always thought there’s a clear need/opportunity for a better way of doing things. When I first saw the DevCon videos showing how the MUD framework worked it reminded me of the early days of the Meteor framework which was seemed like magical frontend/backend sync technology when I first saw it. With MUD we also get the whole decentralised/composability aspect too. It really seems like this could be a challenger and the hackathons a perfect way to get some experience hacking on it!
Solution Overview
Balancer Relayers are contracts that allow users to make calls to the Balancer Vault on behalf of the users. They can use the sender’s ERC20 vault allowance, internal balance, and BPTs on their behalf. As I’ve written before, multiple actions such as exit/join pools, swaps, etc can be chained together, improving the UX.
It’s important to note that because the Relayers have permissions over user funds they have to be authorized by the protocol. This authorisation is handled by Balancer Gorvernance and you can see a past governance proposal and authorisation PR here and here.
The MUD Store is the onchain database that can be written and read from similar to a normal database. The MUD framework handles all the complexity and makes developing with the Store super smooth.
By developing a new MUD enabled Relayer we can use a well established, battle tested Balancer protocol (Balancer 80/20 pools in particular could be interesting as liquidity for gaming assets) combined with all the benefits the MUD framework offers.
The How
Mainnet Forking
By using a local node forked from mainnet we can use all the deployed Balancer info including the real pools, assets and governance setup. To build this into the dev setup based off the MUD template project I added a .env with a mainnet archive from Alchemy and edited the root package.json` node script like so:
Now when the pnpm dev command is run it spins up a forked version of mainnet (with a chainId of 31337 which makes everything else keep working) and all the associated MUD contracts used during the normal dev process will be deployed there for use.
Relayer With MUD
The most recent Balancer Relayer V5 code can be found here. In the Hackathon spirit I decided to develop a very simple (and unsafe) version (I initially tried replicating the Relayer/Library/Multicall approach used by Balancer but had issues with proxy permissions on the store that I didn’t have time to solve). It allows a user to execute a singleSwap. The complete code is shown below:
import { System } from "@latticexyz/world/src/System.sol";
import { Swap } from "../codegen/Tables.sol";
import { IVault } from "@balancer-labs/v2-interfaces/contracts/vault/IVault.sol";
import "@balancer-labs/v2-interfaces/contracts/standalone-utils/IBalancerRelayer.sol";

contract RelayerSystem is System {
  IVault private immutable _vault;

  constructor() {
    _vault = IVault(address(0xBA12222222228d8Ba445958a75a0704d566BF2C8));
  }

  function getVault() public view returns (IVault) {
    return _vault;
  }

  function swap(
        IVault.SingleSwap memory singleSwap,
        IVault.FundManagement calldata funds,
        uint256 limit,
        uint256 deadline,
        uint256 value
    ) external payable returns (uint256) {
        require(funds.sender == msg.sender || funds.sender == address(this), "Incorrect sender");
        uint256 result = getVault().swap{ value: value }(singleSwap, funds, limit, deadline);
        bytes32 key = bytes32(abi.encodePacked(block.number, msg.sender, gasleft()));
        Swap.set(key, address(singleSwap.assetIn), address(singleSwap.assetOut), singleSwap.amount, result);
        return result;
  }
}
I think the simplicity of the code snippet really demonstrates the ease of development using MUD. By simply inheriting from the MUD System I can read and write to the MUD Store. In this case I want to write the assetIn, assetOut, amount and result for the trade being executed into the Swap table in the store where it can be consumed by whoever (see the Front End section below to see how). I do this in:
The rest (including deployment, etc) is all taken care of by the framework 👏
Permissions
Before I can execute swaps, etc there is some housekeeping to take care of. Any Balancer Relayer must be granted permission via Governance before it can be used with the Vault. In practice this means that the AuthorisergrantRoles(roles, relayer) `function must be called from a Governance address. By checking out previous governance actions we can see the DAO Multisig has previously been used to grant roles to relayers. Using hardhat_impersonateAccount on our fork we can send the transaction as if it was from the DAO and grant the required roles to our Relayer. In our case the World calls the Relayer by proxy so we grant the role to the world address (not safe in the real world :P).
async function grantRelayerRoles(account: string) {
    const rpcUrl = `http://127.0.0.1:8545`;
    const provider = new JsonRpcProvider(rpcUrl);
    // These are the join/exit/swap roles for Vault
    const roles = ["0x1282ab709b2b70070f829c46bc36f76b32ad4989fecb2fcb09a1b3ce00bbfc30", "0xc149e88b59429ded7f601ab52ecd62331cac006ae07c16543439ed138dcb8d34", "0x78ad1b68d148c070372f8643c4648efbb63c6a8a338f3c24714868e791367653", "0xeba777d811cd36c06d540d7ff2ed18ed042fd67bbf7c9afcf88c818c7ee6b498", "0x0014a06d322ff07fcc02b12f93eb77bb76e28cdee4fc0670b9dec98d24bbfec8", "0x7b8a1d293670124924a0f532213753b89db10bde737249d4540e9a03657d1aff"];
    // We impersonate the Balancer Governance Safe address as it is authorised to grant roles
    await provider.send('hardhat_impersonateAccount', [governanceSafeAddr]);
    const signer = provider.getSigner(governanceSafeAddr);

    const authoriser = new Contract(authoriserAddr, authoriserAbi, signer);

    const canPerformBefore = await authoriser.callStatic.canPerform(roles[0], account, balancerVaultAddr);

    // Grants the set roles for the account to perform on behalf of users
    const tx = await authoriser.grantRoles(roles, account);
    await tx.wait();
    const canPerformAfter = await authoriser.callStatic.canPerform(roles[0], account, balancerVaultAddr);
    console.log(canPerformBefore, canPerformAfter);
}
The World address is updated each time a change is made to contracts, etc so its useful to use a helper:
import worldsJson from "../../contracts/worlds.json";

export function getWorldAddress(): string {
    const worlds = worldsJson as Partial<Record<string, { address: string; blockNumber?: number }>>;
    const world = worlds['31337'];
    if(!world) throw Error('No World Address');
    return world.address;
}
The Relayer must also be approved by the user who is executing the swap. In this case I select a user account that I know already has some funds and approvals for Balancer Vault. That account must call setRelayerApproval(account, relayer, true) on the Balancer Vault.
In packages/helpers/src/balancerAuth.ts there’s a helper script that can be run using pnpm auth which handles all this and it should be run each time a new World is deployed.
Front End
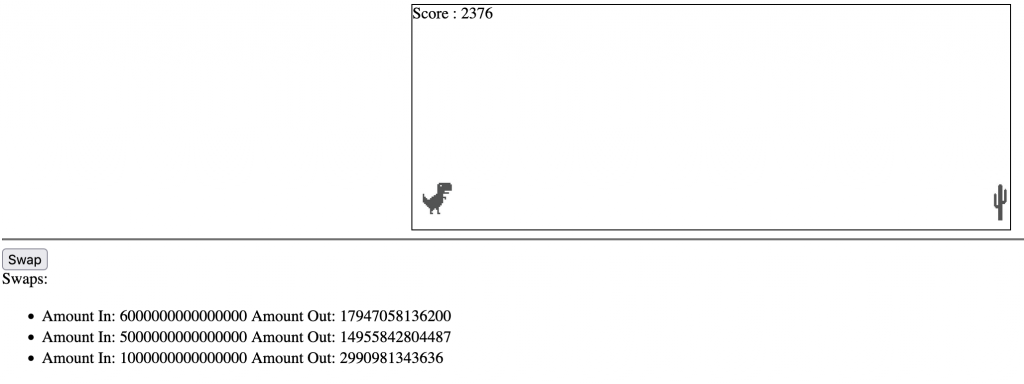
Disclaimer – my front-end UI is ugly and some of the code is hacky, but it works! The idea here was to just show a super simple UI that updates anytime a swap is made through our relayer.
To trigger a swap via the UI I’ve got a simple button wired up to a systemCall:
I took the approach of impersonating the test account that we previously setup the Relayer permission for to avoid the UX of approving, etc via the UI. We just submit the swap data via the worldContract which proxies the call to the Relayer.
To display the swap data from the Store I use the storeCache which is typed and reactive. A simplified snippet shows how:
(One other hack I had to make to get it working. In packages/client/src/mud/getNetworkConfig.ts I had to update the initialBlockNumber to 17295542.)
To demonstrate the reactive nature I also added another helper script that can be used to execute a swap with a random amount (see: packages/helpers/src/worldSwap.ts). This can be run using pnpm swap and its awesome to see the UI update automatically. I also really like the MUD Dev Tools which shows the Store updating.
Composability
I think one of the most exciting and original aspects of Autonomous Worlds is the opportunities for composability. With the standardisation of data formats in the MUD Store experimentation is made easier. As an extremely basic implementation of this I thought it was cool to show how the swap data could be used in another non-defi related app like a game. In this case I implemented the famous Google Dino hopper game where a cactus is encountered whenever a swap is made. We can import the swap data as before and trigger a cactus whenever a new swap record is added. (See packages/client/src/dino for the implementation).
Although basic, hacky and ugly it demonstrates how an Autonomous World of composable games, defi and data can start to develop. The really cool thing is who knows how it takes shape! MUD is a super cool tool and I’m excited to see it develop.
The TypeChain project provides developers a tool to generate TypeScript typings for smart contracts they are interacting with. This gives all the usual benefits of Typing for example – flagging an error if you try to call a function on the smart contract that doesn’t exist.
In the SDK we were using the @balancer-labs/typechain package which aims to provide TypeChain bindings for the most commonly used Balancer contracts but we decided it would be better to remove this dependency and generate the bindings as needed. This enables us to remain up to date with new contracts (e.g. Relayers) without waiting for the package support.
Making The Changes
TypeChain is really pretty easy to use but we had to add a few additonal changes to the SDK.
ABIs To generate the typed wrapper TypeChain uses the Smart Contract ABIs. These were added in src/lib/abi. These can be found in the balancer-v2-monorepo or even from etherscan if the contract is already deployed/verified.
Targets TypeChain will generate appropriate code for a given web3 library. In the SDK we use ethers.js so we need to make sure the @typechain/ethers-v5 package is added to our dev dependencies. (See the other available targets here)
CLI Command To actually generate the files we need to run the typechain command and specifify the correct target, path to ABIs, and out path. For example:
Will target ethers and use the Vault ABI to generate the bindings in the src/contracts dir. You can see the full CLI docs here.
Its recommended that the generated file are not commited to the codebase so we add src/contracts/ to .gitignore. And in package.json a helper is added to scripts:
and the CI is updated to call this command post install.
Updating the code The last change to make was removing the old package and replacing any references to it. This is almost a direct replacement and just requires updating to use the path from the new contracts path. E.g.:
// Old
import { BalancerHelpers__factory } from "@balancer-labs/typechain";
// New
import { BalancerHelpers__factory } from '@/contracts/factories/BalancerHelpers__factory';

// Example of use
this.balancerHelpers = BalancerHelpers__factory.connect(
      this.contractAddresses.balancerHelpers,
      provider
    );
Example Of The Benefits
During the updates one of the benefits was highlighted. A previous example was incorrectly calling the queryExit function on the BalancerHelpers contract. This is a function that although it is used like a view it is actually a special case that requires it to be used with an eth_call (see here for more info). This led to a Type warning when trying to access the response. After correctly updating to use a callStatic the response typing matched the expected.
// Incorrect version
const response = await contracts.balancerHelpers.queryExit(...);
expect(response.amountsIn)....
// Shows: Property 'amountsIn' does not exist on type 'ContractTransaction'.

// Correct version
const response = await contracts.balancerHelpers.callStatic.queryExit
expect(response.amountsIn)....
/*
Shows:
const response: [BigNumber, BigNumber[]] & {
    bptOut: BigNumber;
    amountsIn: BigNumber[];
}
*/
In the Balancer Smart Order Router (SOR) we try to find the best “path” to trade from one token to another. Until recently we only considered paths that consisted of swaps but the Relayer allows us to combine swaps with other actions like pool joins and exits and this opens up new paths to consider.
Pools, Actions and BPTs
Lets take a look at the humble 80/20 BAL/WETH weighted balancer pool and see some of the associated actions.
A token holder can join a Balancer pool by depositing tokens into it using the joinPool function on the vault. In return they receive a Balancer Pool Token (BPT) that represents their share in this pool. A user can join with a single token or a combination of tokens, as long as the tokens used already exist in the pool.
A BPT holder can exit the pool at anytime by providing the BPT back to the Vault using the exitPool function. And they can exit to one or a combination of the pool tokens.
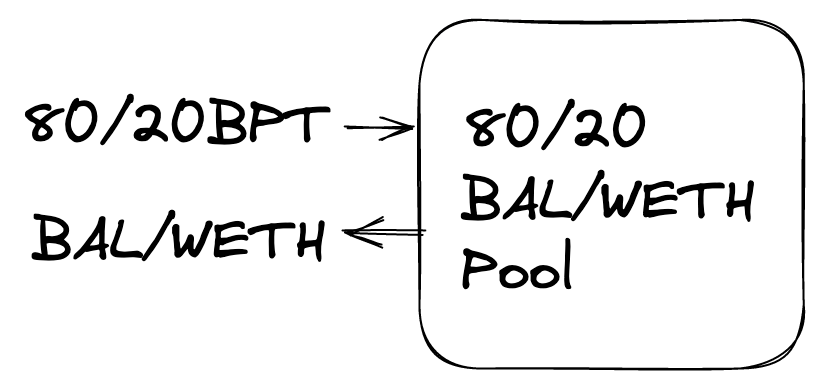
In the Balancer veSystem users lock the BPT of the 80/20 BAL/WETH weighted balancer pool. This is cool because it ensures that even if a large portion of BAL tokens are locked, there is deep liquidity that can be used for swaps.
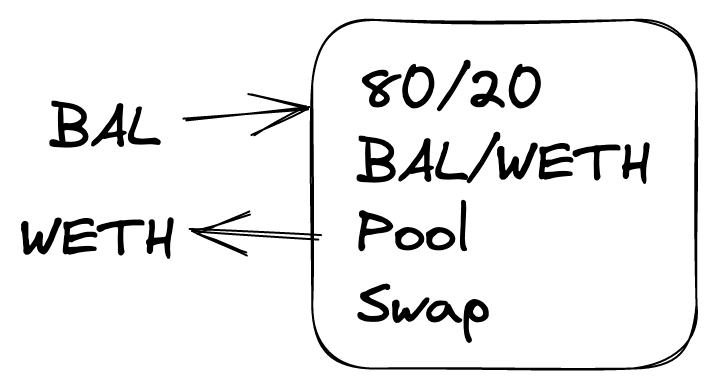
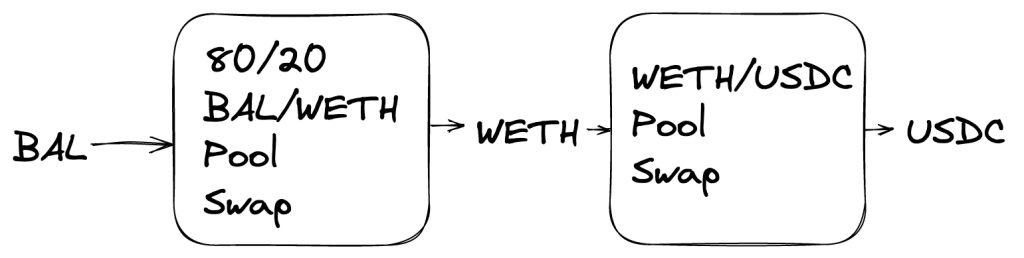
A swap against the 80/20 pool with a “normal” token swap would usually just involve swapping tokens that exist in the pool. e.g. swapping BAL to WETH. This can be achieved by calling the `Swap` function on the Balancer Vault.
We also have multihop swaps that chain together swaps across different pools, which in Balancers case is super efficient because of the Vault architeture. This can be achieved by calling the `batchSwap` function on the Vault.
BPT tokens are actually an ERC20 compatible token which means they have the same approve, transfer, balance functionality as any other ERC20. This means it can itself also be a token within another Balancer pool. This opens up a whole world of interesting use cases, like Boosted Pools. Another example is the auraBal stable pool.
Aura
There’s lots of detailed info in the veBal and Aura docs but as a quick summary:
veBAL (vote-escrow BAL) is a vesting and yield system based based on Curves veCRV system. Users lock the 80/20 BPT and gain voting power and protocol rewards.
Aura Finance is a protocol built on top of the Balancer system to provide maximum incentives to Balancer liquidity providers and BAL stakers.
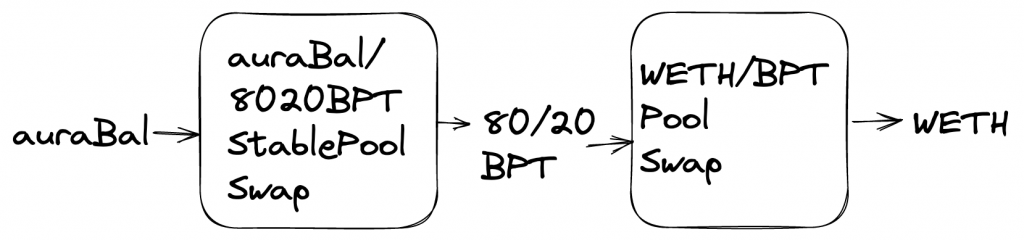
auraBAL is tokenised veBAL and the stable pool consists of auraBal and the 80/20BPT. Now if a user wants to trade auraBal to Weth they can do a multihop swap like:
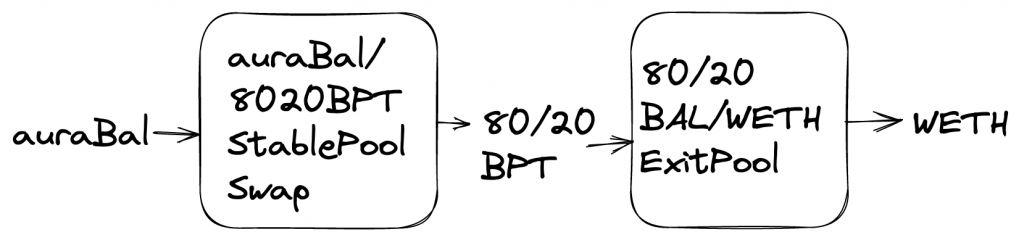
For larger trades this requires deep liquidity in the BPT/WETH pool, which in the Aura case hasn’t always been available. But there is another potential path, using a pool exit, that can make use of the deep liquidity locked in the 80/20 pool:
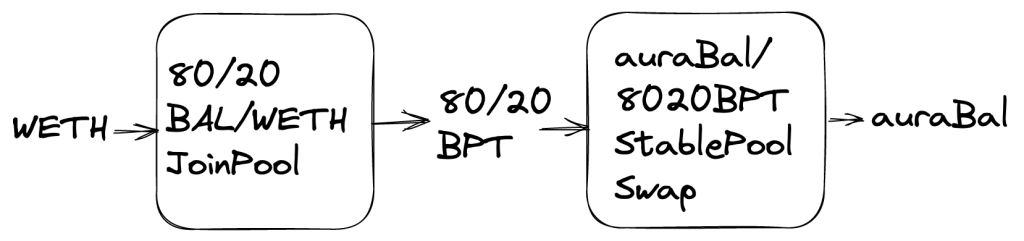
With the similar join path also being available:
Updating The Code
So we can see that adding support for these additional paths is definitely useful but it requires some changes to the existing code.
SOR Path Discovery
First we need to adapt the SOR so it considers join/exits as part of a viable path. An elegant and relatively easy to implement solution was suggested by Fernando. Some pools have pre-minted (or phantom) BPT which basically means the pool contains it’s own BPT in its tokens list. This means a swap can be used to trade to or from a pool token to join or exit, respectively. We can make the SOR consider non preminted pools in the same way by artificially adding the BPT to the pool token list.
        if (useBpts) {
            for (const pool of pools) {
                if (
                    pool.poolType === 'Weighted' ||
                    pool.poolType === 'Investment'
                ) {
                    const BptAsToken: SubgraphToken = {
                        address: pool.address,
                        balance: pool.totalShares,
                        decimals: 18,
                        priceRate: '1',
                        weight: '0',
                    };
                    pool.tokens.push(BptAsToken);
                    pool.tokensList.push(pool.address);
                }
            }
        }
We also have to make sure that each pool also has the relevant maths for BPT<>token swaps. Once these are added the SOR can create the relevant paths and will use the existing algorithm to determine the best price.
Call Construction
Paths containing only swaps can be submitted directly to the Vault batchSwap function. A combination of swaps with joins/exits can not – they have to be submitted via the Relayer multicall function. We wanted to try and keep the SOR focused on path finding so we added some helper functions to the SDK.
The first function `someJoinExit checks whether the paths returned from the SOR need to be submitted via the Vault (e.g. swaps only) or the Relayer (swaps and joins/exits). We can do this by checking if any of the hops involve a weighted pool with one of the tokens being the pool bpt. This works on the assumption that the weighted pools are not preminted.
// Use SOR to get swap information
const swapInfo = await sor.getSwaps(tokenIn, tokenOut, ...);
// Checks if path contains join/exit action
const useRelayer = someJoinExit(pools, swapInfo.swaps, swapInfo.tokenAddresses)
The second, buildRelayerCalls, formats the path data into a set of calls that can be submitted to the Relayer multicall function.
First it creates an action for each part of the path – swap, join or exit using getActions:
  // For each 'swap' create a swap/join/exit action
  const actions = getActions(
    swapInfo.tokenIn,
    swapInfo.tokenOut,
    swapInfo.swaps,
    swapInfo.tokenAddresses,
    slippage,
    pools,
    user,
    relayerAddress
  );
which use the isJoin and isExit functions:
// Finds if a swap returned by SOR is a join by checking if tokenOut === poolAddress
export function isJoin(swap: SwapV2, assets: string[]): boolean {
  // token[join]bpt
  const tokenOut = assets[swap.assetOutIndex];
  const poolAddress = getPoolAddress(swap.poolId);
  return tokenOut.toLowerCase() === poolAddress.toLowerCase();
}

// Finds if a swap returned by SOR is an exit by checking if tokenIn === poolAddress
export function isExit(swap: SwapV2, assets: string[]): boolean {
  // bpt[exit]token
  const tokenIn = assets[swap.assetInIndex];
  const poolAddress = getPoolAddress(swap.poolId);
  return tokenIn.toLowerCase() === poolAddress.toLowerCase();
}
Then these actions are ordered and grouped. The first step is to categorize actions into a Join, Middle or Exit as this determines the order the actions can be done:
export function categorizeActions(actions: Actions[]): Actions[] {
  const enterActions: Actions[] = [];
  const exitActions: Actions[] = [];
  const middleActions: Actions[] = [];
  for (const a of actions) {
    if (a.type === ActionType.Exit || a.type === ActionType.Join) {
      // joins/exits with tokenIn can always be done first
      if (a.hasTokenIn) enterActions.push(a);
      // joins/exits with tokenOut (and not tokenIn) can always be done last
      else if (a.hasTokenOut) exitActions.push(a);
      else middleActions.push(a);
    }
    // All other actions will be chained inbetween
    else middleActions.push(a);
  }
  const allActions: Actions[] = [
    ...enterActions,
    ...middleActions,
    ...exitActions,
  ];
  return allActions;
}
The second step is to batch all sequential swaps together. This should minimise gas cost by making use of the batchSwap function. We use the batchSwapActions function to do this:
and it is essentially checking if subsequent swaps have the same source/destination – if they do then they can be batched together and the relevant assets and limits arrays are updated.
Each of the ordered actions are encoded to their relevant call data. And finally the Relayer multicall is encoded.
And here’s a full example showing how the new functions can be used:
This file contains bidirectional Unicode text that may be interpreted or compiled differently than what appears below. To review, open the file in an editor that reveals hidden Unicode characters.
Learn more about bidirectional Unicode characters
A relayer is a contract that is authorized by the protocol and users to make calls to the Vault on behalf of the users. It can use the sender’s ERC20 vault allowance, internal balance and BPTs on their behalf. Multiple actions (such as exit/join pools, swaps, etc) can be chained together which improves the UX.
For security reasons a Relayer has to be authorised by the Balancer DAO before it can be used (see previous votes for V1 and V2) and even after authorisation each user would still be required to opt into the relayer by submitting an approval transaction or signing a message.
Having the multicall single point of entry prevents reentrancy. The library contract cannot be called directly but the multicall can repeatedly delegatecall into the library code to perform a chain of actions.
Some psuedo code demonstrating how an authorisation, exitPool and swap can be chained and called via the multicall function:
A Relayer can also be approved by using the setRelayerApproval function from the BaseRelayerLibrary contract. Here a signed authorisation message from the user is passed as an input parameter. This allows an approval to be included at the start of a chain of actions so the user only needs to submit a single transaction creating a better UX.
Chained References
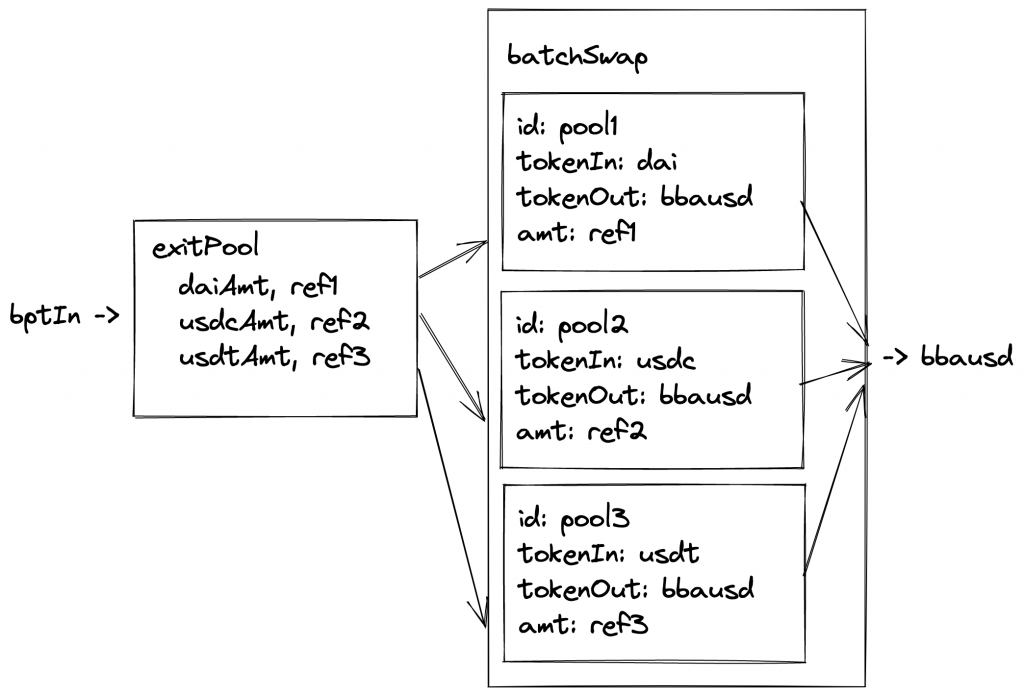
Output References allow the Relayer to store output values from once action which can then be read and used in another action. This allows us to chain together actions. For example we could exit a pool, save the exit amounts of each token to a reference and then do a batchSwap using the references as input amounts for each swap:
Where the key is the slot the value will be stored at. Index indicates which output amount should be stored. For example if exitPool exits to 3 tokens, DAI (index 0), USDC (1), USDT (2), we would want to use index 0 to store DAI, 1 for USDC, etc.
Example Use Case – Pool Migration
Intro
Balancer aims for the best capital efficiency for LPs so it made sense to offer the option to migrate from the old “staBal3” pool consisting of DAI, USDC and USDT to a new “boosted” stable pool which is more capital efficient because it uses yield bearing assets.
To migrate between these pools would take multiple steps:
unstake from staBal3 gauge → staBalBpt
exitPool from staBal, staBalBpt → DAI, USDC, USDT
join the bb-a-usd2 pool by using batchSwaps
DAI → bbausd2Bpt
USDC → bbausd2Bpt
USDT → bbausd2Bpt
stake bbausd2Bpt in gauge
This would be quite an ordeal for a user to do manually but the Relayer can be used to combine all these actions into a single transaction for the user.
Details
As this is a well defined one off action we decided to add this function to the SDK as a “Zap” under a Migrations module. The user can call the staBal3 function to get all the call data required to call the tx:
{ to, data } = migrations.stabal3(
  userAddress,
  staBal3Amount,
  minBbausd2Out,
  isStaked,
  authorisationSignature
);
Behind the scenes all the call data for each step is crafted and the encoded multicall data is returned:
buildSetRelayerApproval allows the user to pass the approval signature if this is their first time using the relayer. This allows us to approve and execute the migration all in a single transaction.
buildWithdraw and buildDeposit handle the gauge actions. The initial call is to withdraw from the staBal gauge and the final call deposits the bbausd2 bpt into the new gauge. We withdraw directly to the Relayer address rather than the users. The gauges return the tokens to the caller, so sending them to the user costs more as we need to manually transfer them:
gauge.withdraw(amount);
// Gauge does not support withdrawing BPT to another address atomically.
// If intended recipient is not the relayer then forward the withdrawn BPT on to the recipient.
if (recipient != address(this)) {
    IERC20 bptToken = gauge.lp_token();
    bptToken.transfer(recipient, amount);
}
Skipping this has two benefits. Firstly it saves gas by avoiding an extra transfer. It also avoids approval issues as now the Relayer is just using its own funds. The final deposit uses the userAddress to send the staked tokens from the Relayer back to the user.
buildExit creates the exitPool call:
// Ask to store exit outputs for batchSwap of exit is used as input to swaps
    const outputReferences = [
      { index: assetOrder.indexOf('DAI'), key: EXIT_DAI },
      { index: assetOrder.indexOf('USDC'), key: EXIT_USDC },
      { index: assetOrder.indexOf('USDT'), key: EXIT_USDT },
    ];

    const callData = Relayer.constructExitCall({
      assets,
      minAmountsOut: ['0', '0', '0'],
      userData,
      toInternalBalance: true,
      poolId: this.addresses.staBal3.id,
      poolKind: 0, // This will always be 0 to match supported Relayer types
      sender,
      recipient: this.addresses.relayer,
      outputReferences,
      exitPoolRequest: {} as ExitPoolRequest,
    });
Output references are used to store the final amounts of each stable token received from the pool. We have precomputed the keys by using the Relayer.toChainedReference helper, like:
Also of interest is the fact we set toInternalBalance to true. The Balancer V2 vault can accrue ERC20 token balances and keep track of them internally in order to allow extremely gas-efficient transfers and swaps. Exiting to internal balances before the swaps allows us to keep gas costs down.
Because we have previously exited into internal balances we also don’t have to worry about the users having previously approved the Relayer for the tokens:
if (fromInternalBalance) {
// We take as many tokens from Internal Balance as possible: any remaining amounts will be transferred.
uint256 deductedBalance = _decreaseInternalBalance(sender, token, amount, true);
// Because deductedBalance will be always the lesser of the current internal balance
// and the amount to decrease, it is safe to perform unchecked arithmetic.
amount -= deductedBalance;
}

if (amount > 0) {
token.safeTransferFrom(sender, address(this), amount);
}
so the amount will be 0 and the safeTransferFrom call will not be executed.
buildSwap – We can join bbausd2 using a swap thanks to the PhantomBpt concept so here we create a batchSwap call that swaps each stable token to the bbausdBpt and we use the output references from the exitPool call as the input amounts to the swap (which is great as we don’t need to precompute these).
This is used as an input to the final gauge deposit to make sure we stake all the BPT that we have received and that should conclude the migration! You can see this in action on a local fork (yay no real funds required!) by running the integration test here.
Conclusion
The Balancer Relayer is probably not that well known so hopefully this has given a good overview of some of its functionality and flexibility. There’s a lot of room for experimentation and improvement of UX for complex operations so its worth investigating!
The idea of adding this was to make accessing Balancer contracts easier for users. Normally you need to find and import ABIs and deal with deployment addresses, if we want to make it easy we should just remove that complexity.
Also we are trying to make the main SDK functions return the contract name and functions as part of the attributes returned. This means the user could then just call using something like:
Typechain is a package that provides TypeScript bindings for Ethereum contracts. This means functions are statically typed and there is also IDE support which makes things safer and easier to develop against.
Balancer has its own @balancer-labs/typechain package that exposes instances of the commononly used contracts. Adding this to the SDK means we can remove the need to import ABI jsons and we can now create instances of contracts by doing:
import {
    Vault__factory
} from '@balancer-labs/typechain';

Vault__factory.connect(
            this.networkConfig.addresses.contracts.vault,
            provider
        );
which will return a typed Vault contract.
Module
Uses BALANCER_NETWORK_CONFIG and config.network to find vault/lidoRelayer/multicall addresses.
Added contracts getter to SDK module:
constructor(
        public config: BalancerSdkConfig,
        public sor = new Sor(config),
        public subgraph = new Subgraph(config),
        public pools = new Pools(config),
        public balancerContracts = new Contracts(config, sor.provider)
    ) { ... }

get contracts(): ContractInstances {
        return this.balancerContracts.contracts;
    }
One interesting discussion is the trade off of using the Contracts module within other modules. As of now only the Swaps and Multicaller modules using contracts. Using the Contracts module means we either have to pass Contracts in constructor, which adds an extra step if someone want to use modules independently:
const contracts = new Contracts(config)
const swaps = new Swaps(config, contracts)
or we instantiate Contracts within the module – which ends up happening twice if we use the high level SDK function as it is also instantiated there. For now we have decided to use the Typechain factories to instantiate the contracts within the module and will revisit in future if needed.
Market-Protocol Fit – describes some of how Balancer ⚖️ are approaching things. It’s a whole new world!
👨🏫 Etsy’s Journey to TypeScript – trying to improve my Typescript as much as possible and there’s some interesting stuff here.
⏱️ Just-in-time Liquidity – pretty interesting MEV attack. Random idea – could this be a type of exchange where users get a better price and “LPs” rebalance?
Cool tool 🧰: eth-sdk, provide the address of the contract you want to interact with and it will pull down abi from Etherscan API and create Typescript and Ethers instances.